Announcement

Collapse
No announcement yet.

Restoration Continues

Collapse
X
 
  • Filter
  • Time
  • Show
Clear All
new posts

  • Restoration Continues

    My original thread was archived and it contains some pics of my FFPW 57 project. My efforts are continuing on more of regular basis, however time is limited but I'm determined to see it through.

    The truck is down to a rolling chassis. I've decided I'm going to have a local machinist open the engine and complete an overhaul. This will be a fall project for him. I really wanted to attempt it but I need to be realistic with time and tooling.
    In the mean time i'm woking on the drive line overhaul and axels. I will be using 4.89 axels instead of the original 5.89. My 56 had the 4.89 and they're in much better shape.
    In preparation for the frame resto I modified a couple of engine stands to make a frame rotisseries for easier resto work and paint. I find myself jumping around from one section to the next. I can't always complete what I have started due to parts required for a particular section, research needing to be done or something of the other slowing me down. I would like to stick to one thing at a time but it's just not feasible. Anyone one else find the same challenge in their resto?
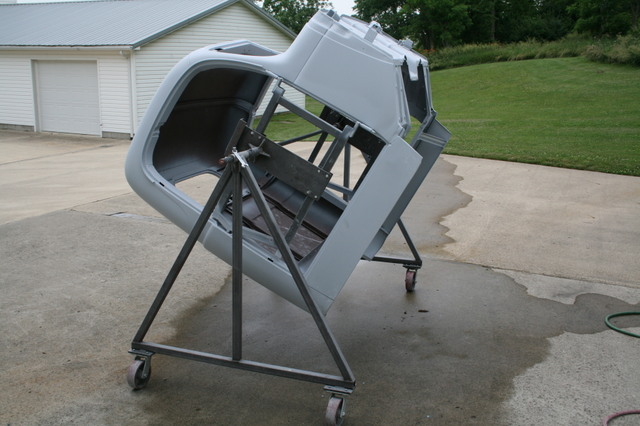
    Attached Files

  • #2
    Frame Work

    I've cut out a approximate 3ft section on ea side of the inside frame rail. They were badly corroded but only in this area for some reason...the crossmember needs work too, yikes! I will have a fab shop form me the proper steel insert and i'll weld and rivet back in place. Anyone know the proper inside frame gauge?
    Attached Files

    Comment


    • #3
      Transfer Case Overhaul

      I read as much as I can find on the topic to start a tear down and inspection. Any tips please before I continue!

      One thing I already noticed is there's only 3 shims verses 4 on the brake drum hub..normal or not. My original manual shows 4. I need to put the vernier to them to see winch one is missing. Possibly someone failed to re-instal? The transfer case and transmission are both primer red in colour and its the original paint. No black to be found. Is it possible these were replaced at one time and the NOS replacement came in this colour or the rebuild shop painted this way? Or factory?
      Attached Files

      Comment


      • #4
        I can't get the front drive pinion out. All the others slide right off..this one is really tight. Possible rust in the splines as theres some evidence of moisture but not that bad. Any ideas on removal? I was going to attempt the bearing puller but stopped as it was getting late. Sprayed some penetrating fluid to see if it would help overnight.
        Attached Files

        Comment


        • #5
          That area of the frame was trouble on mine too. I think it's because that middle crossmember collects debris and moisture in the holes and it just sits. I had a new crossmember built from 3/16" plate, not sure if that's the same as stock, but a little extra doesn't hurt anything.

          There are two special tools listed, neither is that complicated, but I would argue the spacer tool is the more important. The one you use to set the idler gear bearing preload. Without it the only way to do it would be to put the whole thing back in the case and test, and that's a lot more work. The tool in the book looks complicated but it's basically just a spacer designed to make up for the case thickness. I had a friend cut a piece of pipe to roughly the same thickness on his lathe so it was true and it worked well.

          The other tool is helpful but more complicated, you would have to have a machinest make one out of some bar stock. The biggest advantage of it is the ability to drive the pin out without damaging the threaded end of the shaft. It does make installation easier too.

          Otherwise make sure you clean everything well. Mine had lots of gunk (technical term) inside it that had clogged oil passages, some of which I might have missed if I hadn't been lucky/careful during the teardown and rebuild.

          And yes, I'm still stuck waiting on the steering column I ordered so I keep jumping to other tasks if I can. The plus side is it's a nice change of pace sometimes to be able to walk away from something frustrating, or that you are stuck on, but it is also frustrating if you were making good progress. Just part of the fun I guess.

          Keep up the good work!

          Comment


          • #6
            regarding your question:

            "One thing I already noticed is there's only 3 shims verses 4 on the brake drum hub."

            Those shims set the pre-load on the bearings. You need a shim pack to get different size shims. If I recall correctly, (fat chance) the pre-load is 20 oz feet or something. Just a bit of drag.

            Wayne

            Comment


            • #7
              Thanks for the tip Desoto. What is the length and diameter of pipe you used? I will have one made up. I haven't been able to remove the idler gear. It says to drive out the pin with a soft face hammer using a tool. Could I hit a couple times with a brass hammer? How much force does it really take?

              I managed to remove the front drive shaft pinion with the bearing puller. I let it sit overnight with some thread buster. Without effort of the impact gun it came right off. I have found quite of bit of surface rust. Not sure how much is too much. There's a bit of pitting on the main drive gears. Should I worry much about it?

              I also notice the main shaft shifter fork was worn out. Luckily I have a donor transfer case and was able to rob a better fork with much less wear. The new fork has some wear but my thought was to weld and file down to feel it. This piece being cast has me a little nervous about the process. Same part numbers stamped with a slightly different machine casting. Are there published specs on everything for the transfer case to check?

              You can also see on the main gears some deep cut marks. Only appears to be on that one gear. I suspect there was a failure in the past and this unit was overhauled and decided it wasn't worth replacing this particular gear. Should I worry about this gear?

              A couple of the pinions have a wear groove felt by the finger. Should I be replacing these or having them machined for a perfect tolerance?

              I will be needing a complete rebuilt kit for reassembly. I know its frowned upon using the original seals and bearings. What's the recommended aftermarket parts numbers? Should I order these from Charles at M Series Rebuilds or would a bearing supply store cary what I need. I'm not going to attempt to use the bearing over except for the idler as it feels really smooth. Thanks!
              Attached Files

              Comment


              • #8
                ....
                Attached Files

                Comment


                • #9
                  Looks like you are having fun! Charles knows his stuff, and I would trust anything he sells or tells you. I ended up pulling my NP200 several times, the last time to install Charle's stainless shift rails. (the round rod that makes it go from high to low and 2 WD to 4 Wd. Also, if I may suggest, use speedi sleeves on the rotating shafts if they are work at all. Then use double lipped seals. And don't forget to put sealant on the outside of the seal when installing the new seals. And... don't forget to put thread sealant on all the bolts that penetrate the casting. Do that and you will have a transfer case that is leak free. You are into the fun stuff now! I did find a manual online online that tells you how to rebuild the transfer case, let me know if you can't find it.

                  Wayne

                  Comment


                  • #10
                    Thank Wayne. In to the fun stuff for sure... My head is spinning from all the info I've been reading. Im going to open up my tranny this week so I can order everything at once from Charles that's needed.

                    My shifter forks have some wear not too bad. My thought was to weld the eamachine it back down? Is this advisable?

                    Should i be worried about the rust? I also noticed a few of you coated the inside of the case with a special paint? Is that required?

                    I started building the supports for a cab rotisserie. Using materials I have around the shop. Does anyone from experience know where it is best to have the pivot point? Center is my obvious choice.
                    Attached Files

                    Comment


                    • #11
                      Ray: I have a couple of the manuals that give you step by step instructions on how to rebuild the NP-200 transfer case and the NP-420 transmission. Book
                      TM 9-8031-2 is the power train and body for the M37, which shares the same transmission and transfer case. Page 188 has the transfer case. I only have a hard copy of that. I do have a pdf version of the TM 9-2520-232-35. It is larger than 125k so I can't attach it.

                      The inside of the transmission and transfer case can be painted with Glyptol. It is expensive, but works. Here is a link from a local soldier I was helping with his M37.

                      http://www.powerwagonadvertiser.com/...=12670&page=13


                      Shoot me an email if you have any questions. wayne@flymha.com

                      Wayne

                      Comment


                      • #12
                        That's great Wayne thank you! It will make things much easier.

                        I've sent you an email.

                        Comment


                        • #13
                          Here is mine. It was about as close as you could get as far as being balanced. I made it adjustable but the original guess was fine. Looks like My center point is higher than yours unless you make it above you angle brace.

                          Comment


                          • #14
                            Originally posted by Resto Ray View Post
                            Thanks for the tip Desoto. What is the length and diameter of pipe you used? I will have one made up. I haven't been able to remove the idler gear. It says to drive out the pin with a soft face hammer using a tool. Could I hit a couple times with a brass hammer? How much force does it really take?
                            I keep forgetting to measure. Ultimately it needs to slide over the shaft and sit on the inside race of the upper bearing so that the washer and nut push down against the bearing/gear stack. The intent is to make it mimic the case and provide the compression against the bearings in the idler gear, so I just measured the thickness of the case once the flange was removed and had the spacer cut to the same or slightly longer. Since the preload on the bearings is set by the shims between the bearings and the races in the idlear gear it has to be long enough so the nut will press on it but not too long that it doesn't get a good thread engagement.

                            It was rough cut and then turned on a lathe so the ends were parallel and true to prevent uneven loading on the bearings. I think there is a picture in my old build thread (found it check out the photo in post #67)

                            If I remember correctly it took some force to get mine out using a brass drift was very slow as it wanted to mushroom the brass more than drive it out. A press might have been better, though the chance of putting too much force on it is greater.

                            Comment


                            • #15
                              Well I managed to get the idler shaft out. I found a 24mm impact socket that fit perfectly. It took a couple of really good hits to get it to move but after that it was smooth sailing. Case is torn down and parts partially washed.. that crud is tough to remove in the varasol tank. I need to check the tolerances on everything

                              I started tearing down the transmission. Did not go further then the picture shows as I need to look over some instruction. My goal is to indentify the worn out parts and get everything ordered at once.
                              Attached Files

                              Comment

                              Working...
                              X