If this is your first visit, be sure to
check out the FAQ by clicking the
link above. You may have to register
before you can post: click the register link above to proceed. To start viewing messages,
select the forum that you want to visit from the selection below.
Power Wagon T-Shirts are now available for purchase on-line through the Store.
They are only $15.00 each plus shipping.
Shirts are available in sizes from Small thru 4X and are Sand in color.
Design/Logo is printed on the back of the shirts and the front is free of any designs.
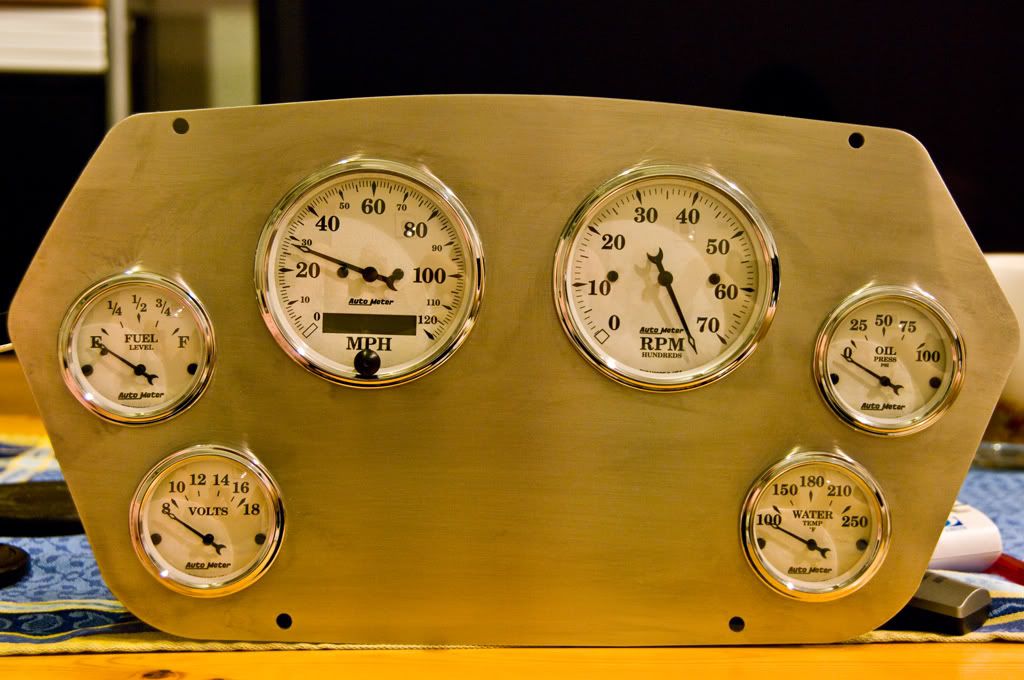
Well, here she be. I think the brushed look fits the gauges quite well. I will probably finish the brushing a bit better and clear over it with some satin to kind of protect the finish a bit.
What thinks we?
P.S. Sorry for the size if its too big for you.
Tomorrow I should get my new dash panel for my gauges from the metal shop. I decided to go with stainless and have them water-jet it out for me. I didnt want to screw with hole saws walking around, scratching the heck out of it, making uneven cuts, putting the hole in the wrong spot, etc.. Was just easier, and probably about the same cost, to have them cut it right the first time with the best possible results. I will try to mount the gauges up and post up a pic to get some opinions.
I am thinking I will try to go with a brushed stainless look, and add a few stainless accents across the dash.
I figure I gotta do my part to get us out of this slump. I was going to spend the money anyway, why not give some of it to a local supplier and the rest to an American worker, instead of most of it to 16 different resalers and a little bit to some Chinese man/woman/kid.
Just a quick note, got a little item yesterday that will help the build along tremendously. Had a junker Harbor Freight Mig welder that I had been trying to use for my repairs. Only succeeded in making a mess. In its place now sits a 120/220V Miller autoset welder that can weld up to 3/8" mild steel in a single pass. 210 Amps of actual welding power. It can weld Stainless with only a change in wire, and with an added spool gun can weld Aluminum. Got the complete setup for $1200, which I didnt think was bad at all.
Just a quick note, got a little item yesterday that will help the build along tremendously. Had a junker Harbor Freight Mig welder that I had been trying to use for my repairs. Only succeeded in making a mess. In its place now sits a 120/220V Miller autoset welder that can weld up to 3/8" mild steel in a single pass. 210 Amps of actual welding power. It can weld Stainless with only a change in wire, and with an added spool gun can weld Aluminum. Got the complete setup for $1200, which I didnt think was bad at all.
Best part, its made in USA! No China junk here!
Ron and Gordon, I am definately keeping track of all the info and as soon as I get to a point where I can start making some progress I will definately be taking plenty of photos, both for my own sake when it comes time to final assemble everything after mock-up and for article writing potential. I am sure there is someone else out there like me that would love to drive some of this old iron, but arent too keen on the idea of double clutching, 55MPH speeds wound out and the plain poor handling of suspension technology of the era. There will be an article, probably quite long winded, but it will take me several months before I can get to that point of having enough progress to write about.
Over Christmas break I was hoping to have a bunch of time to spend working on it but it looks like the in-laws will be flying over from Germany so that idea may not pan out.
Either way I have to get the new frame off the trailer this week, get the bed sitting on it and get the old frame loaded up and out of here. My landlord is probably S#!&ing bricks with all the stuff I am piling up outside. Oh well, such is life when you rent to a car guy right? lol!
Ron, you asked about track width difference. A quick tape across the rear axle tells me the new frame has a 6" wider track width (inside of tire to inside of tire) which looks like it isnt going to hurt me anywhere, at most I will have to stretch rear fenders a bit for clearance, but I dont see a problem right now.
Now why would he want to write an article about his project? To share and help inspire others with their project or dream truck? To have his name in print as author in an international magazine like the PWA? To have people he knows or doesn't know say "Hey didn't you write that great story in the Advertiser? I really liked that thanks" To help Gordon fill the pages of his wonderful magazine? Or all of the above? Ben you are well on your way with what you have posted so far. The problem is that there are a lot of readers of the PWA who do not have internet access. There are probably a lot of forum readers who are not following along but they will read a story in the magazine. You can do a progress story up to where you are now and later write a wrap up on how the truck turned out. Go ahead it's painless. This was unsolicited, I just like to see others stories in print.
Guess I missed that update, Ron has claim to the gauge cluster. If for some reason he doesnt need/want them I will make sure to contact you about them Jakenok. By the way, just saw your Townie thread, pretty cool looking rig you got there. Will be fun.
Another small update, picked up my donor frame yesterday. Its sitting on a trailer in front of the house for now. I pulled all the wiring off to sort through, and to keep prying fingers away from hijacking stuff I may need. I am going to use all of the donor engine wiring so that I can keep the MPFI setup working properly. I will have to integrate a few interior things like OD off switch and I definately want to put an OBD-II port somewhere easily accessible for diagnostic purposes. Didnt get that done with my Jeep swap and am regretting it with a driveability problem I am chasing down.
As soon as I get it down off the trailer I will post up some pics.
Prelim measurements tell me the front cab mounts are almost the exact same between the 2 trucks, WHODA THUNK THAT?! I will have to remove the rear ones from the original frame mostly because my old man needed the ones off the donor frame for the extended cab from it he is putting on his regular cab/chassis frame, which is how I came about the frame in the first place. It looks like I will end up taking about 20" out of the donor frame to make the wheelbase the same as the original (donor was a '97 3/4 ton extended cab short bed). Frame width is definately wider, but I dont think that is a big deal at all. Only major thing I have to think of a workaround for is the fuel filler neck. I want to use the original passenger side rear neck but the donor has the typical drivers side in front of axle location. I may end up going with a custom tank behind the rear axle since I wont be keeping the spare in that location anyway. The spare will go where it belongs on a Utiline bed, in front of the drivers side fender in the cutout.
How about doing an article or several for the magazine, Power Wagon Advertiser? Ron may choose to comment on that, too!
Ben I forgot about that gauge cluster you had, refresh my memory in an email please. I know what you mean about some things fitting old to new. I put a Reese hitch from a late model Dodge on my 64 Townwagon and I didn't have to drill any holes. Now if it had a hitch before I don't know but I doubt it.
You say you have shorten the frame but how is the track width between the two trucks? I've never measured that to compare. Glad you understand all the electrical because that is one of my short comings, wiring. With transfering everything over you will be far ahead of the game.
Jake has a good base to work with and will have a great time with his truck like we all do.
Guess I missed that update, Ron has claim to the gauge cluster. If for some reason he doesnt need/want them I will make sure to contact you about them Jakenok. By the way, just saw your Townie thread, pretty cool looking rig you got there. Will be fun.
Another small update, picked up my donor frame yesterday. Its sitting on a trailer in front of the house for now. I pulled all the wiring off to sort through, and to keep prying fingers away from hijacking stuff I may need. I am going to use all of the donor engine wiring so that I can keep the MPFI setup working properly. I will have to integrate a few interior things like OD off switch and I definately want to put an OBD-II port somewhere easily accessible for diagnostic purposes. Didnt get that done with my Jeep swap and am regretting it with a driveability problem I am chasing down.
As soon as I get it down off the trailer I will post up some pics.
Prelim measurements tell me the front cab mounts are almost the exact same between the 2 trucks, WHODA THUNK THAT?! I will have to remove the rear ones from the original frame mostly because my old man needed the ones off the donor frame for the extended cab from it he is putting on his regular cab/chassis frame, which is how I came about the frame in the first place. It looks like I will end up taking about 20" out of the donor frame to make the wheelbase the same as the original (donor was a '97 3/4 ton extended cab short bed). Frame width is definately wider, but I dont think that is a big deal at all. Only major thing I have to think of a workaround for is the fuel filler neck. I want to use the original passenger side rear neck but the donor has the typical drivers side in front of axle location. I may end up going with a custom tank behind the rear axle since I wont be keeping the spare in that location anyway. The spare will go where it belongs on a Utiline bed, in front of the drivers side fender in the cutout.
Last edited by MoparFreak69; 11-07-2010, 01:31 PM.
Reason: I speel guud!
Ben you're right about reinforcing the floor it's pretty flimsy for mounting anything other than stock seats. Looks like it's going to come out nice hope the steering wheel position is good with the seat. Glad to hear you got a title I need to get one transfered on a truck.
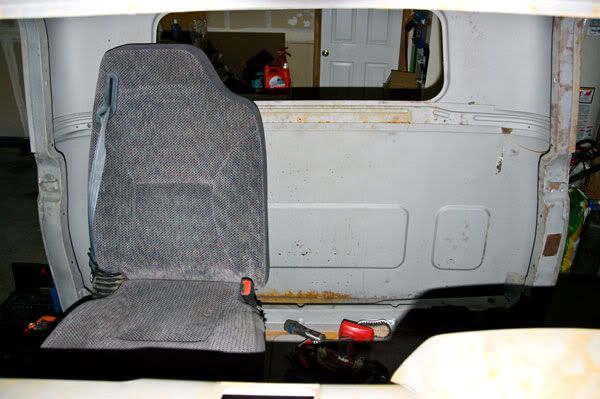
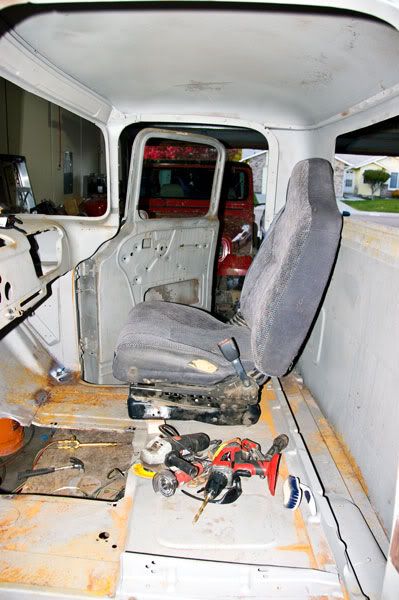
They seem to fit pretty well. I need to adjust the height a bit, I may end up fabbing my own mount brackets up. I guess I will see when I get then modified a bit more and see if I can get them looking decent.
Got the passenger side seat mount half modified to give me a comfortable seating position with good visibility. Really all I ended up needing to do to it was cut an inch out of the right front mount position to bring it up level with the rear two. I will have to drop the left front mount down that same inch to make it nice and level. I think I will take some pretty healthy angle stock and make a frame to weld under the floor to give it a bit more support, as there really doesnt seem to be a whole lot under there. I guess with the bench its not really necessary, but with bucket seats, and with the mounts also handling seat belt duties its better to be safe than sorry in that aspect.
I'll post up some before/after pics after I get one seat mount finished so you can see what it takes to fit the '94-'01 Ram quad cab seats onto the flat floors our trucks have.
Looks good and remember any progress is good progress.
That is a mantra I will staple over the garage door.. it can get hard to celebrate the countless little things when the big picture seems to move sooooh slowly.

Leave a comment: