Announcement

Collapse
No announcement yet.

The WC53 Carryall thread .

Collapse
X
 
  • Filter
  • Time
  • Show
Clear All
new posts

  • Auxillary fuse box

    This is located on the inside of the Carryall above the battery box. When I first installed the fuse box I realized that the master battery control switch did not turn the fuse box off. There are two circuits for the second heater fan and another for the coolant circulation pump, plus three more that have yet to be used. The coolant pump was the one that I would most likely forget to turn off and leaving it running would kill the battery. . The solution was to have the whole shebang controlled from my ignition key. The key causes the solenoid to engage and shunt power to the box. The pump and fan are controlled by switches on the dash. There are enough switches that labelling them makes sense.
    Attached Files

    Comment


    • Thats really clean and really cool Bruce! Very nice work! I envy your patience with the wiring and am hoping that I can use your organization and final fitment as a benchmark to try and get mine to. I have no real experience with wiring other than a few trailers and some easy as pie stereo work back in high school. I have been accumulating some pieces and parts and will need to start snagging some tools for mine. I had actually ordered the CAN/BUS system only but an hour or so before you made your wiring post but it has a few week lead time so I'll be ecstatic if it shows up before Christmas; and talk about a learning process. Cool thing is that I'll be able to use a lot of stock type switches just set to close a ground circuit to turn on head lights, etc.

      Speaking of switches, I am trying to think of a method/place/format/type to hide a few switches for some extra things. As things go along I intend to look into power windows for the rear 4 so that I can control them from up front without having to pull over, climb in the back, and wind the windows up or down. Along with that, I have plans for a small air compressor in the battery box and eventually air locking front and rear differentials. So, how and where to I hide switches and indicators that don't stand out too much and appear too new?
      1942 WC53 Carryall in progress.

      Comment


      • Electric window switch location

        Hmmm, toggle switches if you have to see them, standard paddle switches if they are out of sight. You are going to run four or five three position switches, the fifth switch would be a master for all four windows.

        (1) toggle switches to the left of the gauge panel
        (2) add a drop panel under the stock switch location at the centre of the dash, it would look stock 1.75 to 2 inches in width with a rolled or beaded edge. Again go with the toggle switches
        (3) under the seat on the face of the seat base. Front or left side
        (4) Door arm rest at the bottom of the pull, the switches could be the paddle type
        because they would be hard to see unless looking inside the pull area.
        (5) Bottom of the arm rest, might be a PITA to operate the correct switch though.
        (6) Split arm rest, you flip the top of the arm rest and the switches are hidden underneath.
        That is a start.
        #4 I think is eloquent, but i am not sure it is the best way to go.
        IMG_1394.JPGIMG_1395.JPG

        I have a few switches in my dash, I spread them out to help make it easier to remember what they are for. To the left are a backup light and fan switch. To the right are the front and rear ARB locker switches, they are air, in the middle is a switch for the rear heater, air compressor, and finally a switch for the heater coolant pump. Heater switches are in the stock switch location along with ignition switch and light switch.

        Comment


        • PS reservoir

          on the PS reservoir did you form the domed ends or is it something you can buy and put the bead in? looks great.

          Comment


          • Working on the rear gate

            I am working on the rear gate. Getting the latch mechanism to work now that the door is skinned and the braces are in place is problematic. For now I will leave the mechanism exposed, and if I get the right equipment I will refine it later.
            I have to add one more guage and the air controls for the guage as well. Not too impressed by that, because I am out of room. So far anywhere I install the setup will look out of place.
            So I am down to
            (1) rear tailgate
            (2) two wiring circuits
            (3) clean up wiring under the dash
            (4) airlines, airlines and air controls and another air line.
            (4) throttle linkage
            (5) throttle pedal
            (6) Rad overflow
            (7) shift boots
            (8) interior
            (9) paint - which will be on going.

            Comment


            • Originally posted by Kaegi View Post
              on the PS reservoir did you form the domed ends or is it something you can buy and put the bead in? looks great.
              The dome is something that is made by a company called "BungKing" and they have an online store. Be careful what you click on when you search for it on the internet... yikes.. Ha ha. They have a couple different sizes. The beaded deal is just some thin ERW tube that I stuck onto the end of my bead roller and rolled the beads into it myself. I messed with a couple of shapes on the scrap drop before just going with the bulb beads for the sake of the clamps biting it well. Its also where the vented caps and stuff came from. The AN fittings are all NPT to AN adapters that I chucked onto the lathe and turned down the threads, parted off short enough and then TIG'd into the tangent tubes to reduce aeration of the fluid.

              Originally posted by Bruce in BC View Post
              I am working on the rear gate. Getting the latch mechanism to work now that the door is skinned and the braces are in place is problematic. For now I will leave the mechanism exposed, and if I get the right equipment I will refine it later.
              I have to add one more guage and the air controls for the guage as well. Not too impressed by that, because I am out of room. So far anywhere I install the setup will look out of place.
              So I am down to
              (1) rear tailgate
              (2) two wiring circuits
              (3) clean up wiring under the dash
              (4) airlines, airlines and air controls and another air line.
              (4) throttle linkage
              (5) throttle pedal
              (6) Rad overflow
              (7) shift boots
              (8) interior
              (9) paint - which will be on going.
              Your list sounds like mine.. For every two things you complete, it yields at minimum one additional thing to address. I am trying to minimize the number of gages and just go with an idiot light on a few things. Probably not going to run a voltage Gauge as I am not going to be running a lot of heavy electrical things but will have an idiot light and have it set in my can-bus system to come on if the voltage drops below a certain point.

              As for switches, I am planning to re-use original type headlight switches but wire them to a closed ground circuit and trigger the relay that way. For switches, I found a bulk of OD green Mil-spec surplus double through momentary toggles that aren't too bulky so that I can hopefully blend them in somewhere and use them for various features. I bought as many as the place had so that if I add things int he future, I'll still have the matching switches later on / also for sake of replacement.
              1942 WC53 Carryall in progress.

              Comment


              • thanks I have seen the bung king on ebay I believe. I think we are going to stick with current plan for now. our brake fluid reservoirs are very similar to what old Mercedes and British cars used way back. But made here and less money. ;/)

                Comment


                • Tailgate latches and welding in the dark.

                  I did a test fit with one of my latches yesterday and was just a tad upset when I could not get it to release. So in an act of desperation I cut the end off a bolt and welded it to the rod. Because it was blowing like the dickens outside and I do not weld in my shop it was necessary to wait until the wind died down. By then it was dark. For some reason my automatic welding helmet will not work in the dark. So I pulled out my old gold plated welding helmet that I used to use when welding stick and did the best that I could. After a bit of grinding, shaping, filing I got part of it to work and the latches now activate.

                  In the long run the mechanism will get buried inside the door, but for now I plan on running it exposed. WHY? Well I do not have the time to mess around with it, I need to get this puppy on the road.

                  Boy was I pleased when I slid the pin sideways and the latch worked. Got one more piece to add so the door will stay closed and the other side needs to be messed with. The aluminum plate will get painted and scuff sanded. The original floor diamond pattern would be cooler to use but none was available.

                  Yes the wood under the pin will get hidden by a nice clean box at a later date.
                  Attached Files

                  Comment


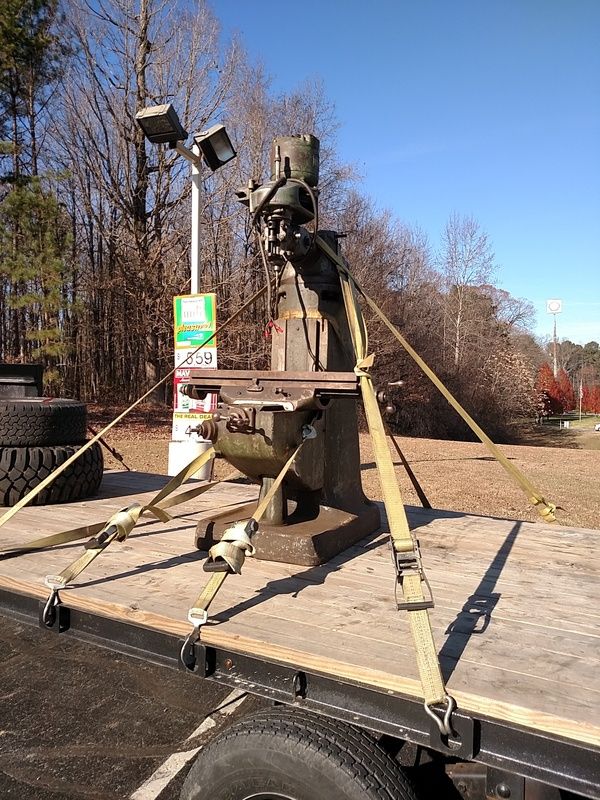
                  • Well, I found a garage friend for my Carryall. Built right around the same era.

                    Bridgeport Vertical Milling machine that needs some loving. Its not a big one but its big enough to replace my small Clausing and...

                    Serial number 3905... built in November of 1943... Appropriate age for my shop I do believe.

                    1942 WC53 Carryall in progress.

                    Comment


                    • mill

                      I would love to have a mill that size. as rare as I would use it perfect. better keep it that color. ;/)

                      Comment


                      • tailgate is done, sorta , almost, kinda, good enough for now done.

                        It opens , it closes, the catches and latches work with a little bit of encouragement. I do not think it will pop open on the road and leave a trail of supplies scattered across the environment. I added a oil hole toeach lower hinge for lubrication because the hinges seem to weld themselves in place after awhile. The part that should be tight starts to spin and the part that is supposed to allow the hinge to work gets rusted tight. This accelerates the wear on the hinge.
                        It would look way nicer to have the latch rods buried inside the door. The problem was I installed a bunch of wood bracing and it is in the way. The paint is far from done. going to do several coats and then sand it out and clear coat the remains. That will get done next year when warm.

                        edit: Bridgeport machine, something every Carryall owner should get for christmas. that is sweet.
                        Attached Files

                        Comment


                        • Lower Hinge Lubrication

                          Where on the lower hinge did you drill an oil hole to keep it lubricated?

                          Comment


                          • Lower hinge lubrication hole

                            The hole is drilled in the centre of the lower hinge half. This is the half that bolts to the body not the part that bolts to the gate. You can see some brass sticking out the side of the upper hinge. I had to add this because the hinge was hogged out in this area. The pin does not rotate on the brass and is in effect fixed to the gate half of the hinge. It will get locktited in place and even half installed it does not move.
                            The hole is about 1/8" maybe a tad less, the hole is beveled and a pump style grease gun that you would use on a chainsaw bar fits the taper. I hope the picture helps. It is nice to see a new member on the thread.
                            Attached Files

                            Comment


                            • majority of the on board air is on board.

                              Got to test my air system tonight. Blew off a couple of lines that were not tightened and have a leak at the tank that will be dealt with tomorrow. Lots of fittings, and quite a few lines.
                              Got manual switches for the ARB lockers, front and rear. Got a control for the two air bags in the rear. I made up my own. The Firestone unit was about $360 bucks which I think is way out of line. The mark up is absurd. I made my own from a bit of this and that. Mounted it in the glove box. I ran out of the old style manual switches and the two I did order online look like junk to me. So I went for some paddle style switches.
                              Going to run some 3/8 DOT hose and have some air fittings at the front and back so I can fill my tires.
                              After this it is on to the throttle connection.
                              Attached Files

                              Comment


                              • Moving along nicely Bruce! I like it! All well thought out! Keep it up, you're almost there!
                                1942 WC53 Carryall in progress.

                                Comment

                                Working...
                                X