 Tweet
Tweet
I hate messing with the ring and pinion set up, it's the one thing, the only thing, I send out....I'd guess that your ring gear/carrier needs to be shimmed to move the ring in or out to complete that adjustment, you can't do it all with just pinion depth.
-
-
Ring gear revisited
Moving the ring gear in or out will increase or decrease the back lash . It is at .008 at present . Stock is .006 to .010 . I am not positive but I think moving the ring gear / carrier assemble in will move the pattern towards the root of the ring gear . I think it would only be a small amount . The pattern is very good at present but not centered between the root and the face . The pattern is biased towards the top . I have no clue if this is ok or not , but I think I need to get the pattern down a tad more . Of course the batteries are dead in the camera . I can do nothing tomorrow. I am off clearing a trail sumplace or other .
BruceComment
-
Any move that you make with the ring has to be matched by a coresponding move with the pinion. The factory specs that you are referencing are the starting point only for brand new gears, not the end all be all. If you shim the ring away, the pinion must move "out" to remain in the contact patch, if you shim the ring in tighter, the pinion must move "out" to maintain the contact patch. It's hard to do, requires a lot of patience and it's even harder to explain in text....ha!ha!
Let's start with this question, are the ring and pinion the original matched set?
Is there noticeable wear or discoloring?
Drive Side Coast Side
Heel Toe Toe Heel
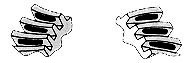
Normal or desirable pattern. The drive pattern should be centered on the tooth. The coast pattern should be centered on the tooth, but may be slightly toward the toe. There should be some clearance between the pattern and the top of the tooth.
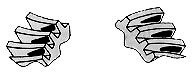
Backlash correct. Thinner pinion position shim required.
Backlash correct. Thicker pinion position shim required.Comment
-
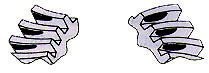
Pinion position shim correct. Decrease backlash.
Pinion position shim correct. Increase backlash.
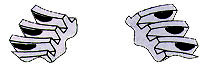
PATTERN MOVEMENTS SUMMARIZED
(1) Decreasing backlash moves the ring gear closer to the pinion.
Drive pattern (convex side of gear) moves slightly lower and toward the toe.
Coast pattern (concave side of gear) moves lower and toward the toe.
(2) Increasing backlash moves the ring gear away from the pinion.
Drive pattern moves slightly higher and toward the heel.
Coast pattern moves higher and towards the heel.
(3) Thicker pinion position shim with the backlash constant moves the pinion closer to the ring gear.
Drive pattern moves deeper on the tooth (flank contact) and slightly toward the toe.
Coast pattern moves deeper on the tooth and toward the heel.
(4) Thinner pinion position shim with the backlash constant moves the pinion further from the ring gear.
Drive pattern moves toward the top of the tooth (face contact) and toward the heel.
Coast pattern moves toward the top of the tooth and slightly toward the toe.
Hope that helped.Comment
-
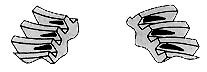
Ring gear pattern pictures
Ok here is a picture of my pattern with the pinion depth set at what the specs call for . I think the pattern is too close to the top of the ring gear . You can see a lot more paint at the bottom of the gear face than at the top . These are new 4.88 yukon gears .I will move it up a few thousandths and see if it makes a diference . I am using set up bearings while doing this and have a dial guage , carrier spreader , a sketchy manual and a brain . I was told to only use the carrier spreader when setting the carrier bearing preload . This makes sense to me .
If I had done this before and run the gears I would have a good idea of what to expect . A day in a gear shop would do me good .Comment
-
Close! But per my sketches shown a thinner pinion shim is needed. What does the coast side look like?Comment
-
Both sides are shown.
Unfortunitly one side is out of focus .The fussy shot is the opposite side of the clear one.
I will try using a slimmer shim on the pinion but I think the clearance at the top of the ring is too small already .
lots of fun .Comment
-
Ha!Ha!
DOH! Yes you did...I'll close my good eye from now on....the shim change would have to be very, very, very slight as you're almost there. Since I don't dabble in these I can't tell you how many thousands it takes to get the movement you need.Comment
-
vrooooommmm
I may have a 4bt. A running 4bt at that . I bought a ford van of questionable milage , but I was told it was the lowest of the lot. If everything works out as stated I will be darn happy. I had to keep raising the bid for the last 15 minutes because someone kept walking on my bid . I was the only bidder for most of the first few days. Placed my last one 2 minutes before closing . I almost ended up with 3 . Turns out I had placed some bids that stayed there until about 2 today.
I got called out on an emergency while in the middle of changing some shims on the rear end . Of course I could not remember if I had pulled 5 thousand out of the pack and had to reassemble the whole rear end . Of course the pattern is not any where to what it was .
BruceComment
-
Of course....= )
Cool news on the 4bt!Comment
-
rear axle is done and in .
I need to set up the brakes and shim the custom caliper mounts but the axle is done. Lots of little stuff to do like shock mounts and air bag mounts but that can wait until the front is squared away and the motor is in.
I am running 78 caddy calipers and need to dig up the springs and leavers for the darn things. All this little stuff takes time and alot of coin .
If anybody is considering doing this type of build you are better off buying a rollover and parting out what you do not want . In retrospect I should have gone this way . The new Ford and Dodge rears come with the discs and the new Fords have a dana 60 in the front with hubs .
Piecing one together has a tendancy to nickle and dime you to death . Rebuilding everything takes up alot of time too . It is not so bad rebuilding the odd part while you are driving but to go through everything does suck up a great amount of time.
Off to a swap meet tomorrow . Looking for a NOS windshield but will take what I can find .
BruceComment
-
Is this exhaust too small ?
3.5 diameter , stainless pipe from a 7.3 litre Ford . The unit has 68 kilometers on it. I am pretty sure this will help keep the noise down when the 4bt is fired up. I will run the cat along with the muffler.
I have a passenger drop transfer case. With the exhaust running down this side of the truck I wonder how tight things are going to get ?
BruceComment
-
3.5 may be a little big. i clocked my transfer flat but it LOOKS like 3 may fit....Comment
-
How many hours does it take to clean an axle..
It takes about 3 times more than you would think . I worked steady today for 2 hours scraping some knuckles and taping off about 1/2 of the parts for sandblasting . While I was taping I had a student sandblast the parts . The kid put in a steady 2 hours too. So I got 4 hours in and figure it will take about 6 more hours to get everything stripped and painted . This is not counting the time to disassemble the axle , set up the new gears , install the new U joints and reassemble the whole shebang .
All told I think a person could count on 20 hrs to strip , paint and rebuild a complete axle .
BruceComment
-
I hear ya Bruce,
How do these things get that filthy?
I got my frame blasted and painted with POR 15 paint. I now have the wheels painted and some ok rubber wrapped around them until I decide to shell out the big bucks for NDT tires. I had one hub that would not let go of the lug nuts so I finally cut them off with a torch, now I'll have to insert new lug bolts.
Next job is to paint and install the engine and transmission and before I can do that I have to finish assembly on the rebuilt tractor engine so that I have a hoist. Always something that needs your attention it seems.Comment
Comment