Announcement

Collapse
No announcement yet.

46 FFPW Restoration

Collapse
X
 
  • Filter
  • Time
  • Show
Clear All
new posts

  • #76
    Originally posted by PWFFnut View Post
    When I changed the T case in My 56 Pw I put a 2''x12'' flat on the ground put the T case on the plank slid it under the truck lifted the plank one end at a time with one hand & put blocks under it until it was the rite hight then the blots went in easy hope this helps when you get that far

    nice job you are doing on your truck!

    PS when you are finished you will love driving your truck!
    I love to drive mine & the looks I get are are very funny some times
    Thanks!

    My neighbor just purchased a transmission floor jack for some work on his Land Rover, so I'll probably bribe him to borrow it. I have one for use with the lift but it's about 4-feet tall, and I don't want to have to lift the t-case onto it. Plus it would be too high to easily access the mounting bolts from the top side. For now I picked up a little furnature dolly I'll set it on so I can move it around to keep it out of my way until it's ready to go back in the frame.

    My next major task it to get the frame checked and if necessary straightened. My measurements have been close but not exact, and I'm not sure if that's just my inability to get a good measurement or if the frame is slightly tweaked (it was a tow truck, and the frame extensions and bumper were bent from pushing something heavy). So I'll have it hauled to a frame shop and verified before I start any further work.

    After that I'll work on replacing the third crossmemeber (in front of the rear axle). The corrosion here is worse than I initially thought so to be on the safe side I'll either try and replace it with a take-out piece or build one out of plate steel.

    Not sure how far I'll get by October when my next project starts at work. That will keep me out of the garage for at least a few months due to the schedule and travel required. Even if I get the above done I'll probably not get the frame blasted and painted or powder coated until after work slows down, since the frame would end up sitting outside all that time.

    Comment


    • #77
      There was an article in the PWA magazine several years ago with a drawing and dimensions of a simply made jig that fits on a floor jack that holds the PW transfer case.
      I did not know about it when I used a floor jack (and helper) to lift mine up in position with a floor jack.
      I bought an inexpensive transmission adapter for a floor jack on ebay (these are cheap there) and it worked very well when I had to pull my NV5600 tranny from my 2001 Ram CTD truck. THis tranny weighs about 400 I think and the rig worked well to get it out.

      Comment


      • #78
        Winch

        Work has been slow lately, with the 90+ degree temps my motivation to work outside has been low. The weekend saw nicer weather so I moved the transfer case off the work bench and decided I'd start playing with the winch.

        I pulled the cable off the winch drum, scraped off some of the 60 year old grease, hit it with some degreaser and then pressure washed. It's still dirty, just less so.


        With the winch in the garage I removed the drain plug and got nothing but some water, probably from the pressure washer. Then I started disassembling the frame. Two required the breaker bar, one of which snapped. The rest came out with the impact gun. That released the end support, the drum, and with a little wiggling the engagement clutch.


        The brake drum doesn't look like it's seen much use. The first big problem has been trying to remove the U-joint on the input shaft. I pulled the pin but it's still on there. I tried to take the U-joint apart but apparently someone lost a few of the little screws that hold covers over the ends of the U-joint and their solution was to weld or braze the covers on. So I haven't figured how I'm going to get that off yet.


        I got the brake drum off the other end of the shaft but the key in that end prevents the axle from coming out of the carrier.

        I have the PDF file from the PACCAR web site but it doesn't go into great detail. The manual doesn't have much either. They're not insanely complex but a good diagram would be nice. I'll finish tear-down and then get together a list of parts and work on cleaning and prep.

        Comment


        • #79
          Winch 2

          Finished dis-assembly of the winch. Managed to get the yoke off the input shaft. I had to cut the weld around the seam on the other end with a Dremel tool and then bust it loose with a cold chisel so I could drive out the U-joint.

          With the U-joint removed I could use a two jaw puller to remove the yoke by putting the fingers into the U-joint holes and using a long socket to provide the extra length for the screw. Made quick work of removing the input yoke, the worm shaft came out easily after that.


          To get the main shaft and bronze gear out of the case I had to pull the two keys. A pair of Vice-Grips and a reflexive mallet removed one, a trick with some computer air seemed to help me work it loose. The shaft and gear came out of the case with a little twisting.


          The shaft gear looks good, but I'm concerned about the worm gear. There are some spots that have some surface rust since there was little to no grease in the case.


          Not sure if I can clean them up enough or if I'll have to look at replacing it. According to the manual the gears should be replaced together, which gets rather expensive. Otherwise it doesn't seem like the winch had seen a lot of use. Time to fire up the parts washer, I ordered new bearings, gaskets, and seals.

          Anyone have the specs for the bushings the main shaft rides on?

          Comment


          • #80
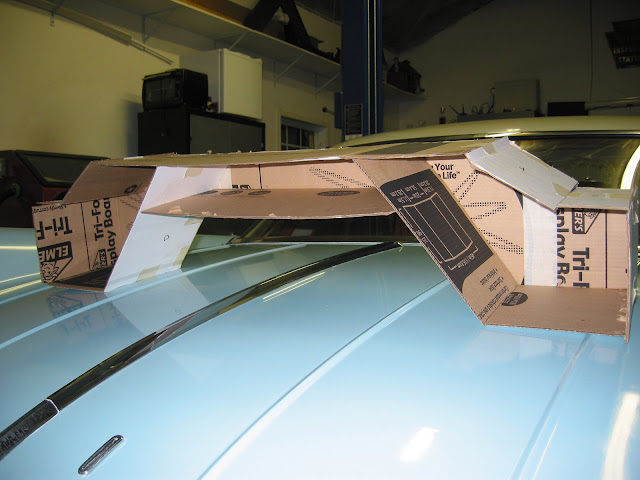
            mockup

            The winch parts are all cleaned up and ready to be blasted. My air compressor is not up to blasting all the winch parts, and I'm not ready to purchase a new one yet with my business trip looming. I can't do the winch drum with my cabinet anyway so I'll probably just drop all the parts off at the shop that did the transfer case so they all match.

            In the interim I've been working on building a template of the third crossmember. Mine is badly rusted so I'm going to build a new one out of plate steel. So with some cardboard I mocked up the new design and I'll get a shop to cut the pieces out for me.


            I didn't bother to close the front side since it will just be templated from the back side. I extended the two lower angle plates up to the top plate for added strength. The ends will be solid panels vice a flange like the stock to add some additional strength to the frame and make it easier to fab, I left them a little long so I could weld both side to the side panels. I'll weld nuts on the inside and bolt through.

            Don't know if I'll get it done before I leave on my business trip but it doesn't really matter.

            Comment


            • #81
              Archived

              Well I guess that's what happens when you sit too long, you get archived! I returned home about two weeks ago from San Diego where I had been sent for work for the last 6 months. It's a lovely place but it's not home.

              In any event I'm excited to get back on the Power Wagon, I had been hoping to pick up a bunch of nice western parts but not a lot is out there right now, as far as I could find. I did get a few but not what I had been expecting.

              Regardless I'm not sure if I'll continue this thread in the Archives or start a new one in the regular message board.

              Comment

              Working...
              X