Announcement

Collapse
No announcement yet.

Salt Lake City '58 W300M Thread

Collapse
X
 
  • Filter
  • Time
  • Show
Clear All
new posts

  • #46
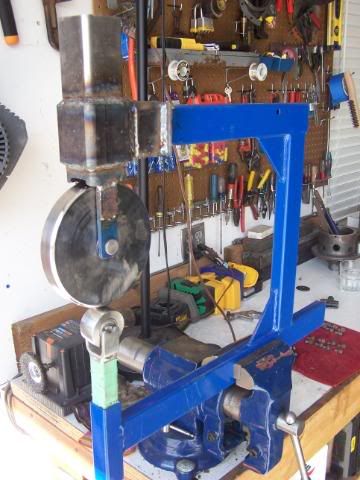
    Modified HF Benchtop English Wheel

    Hi Ringodog,

    Here's the setup I used for my "handheld" English Wheel. Basically, I just cut the old "head" off, and welded in another head, but rotated 90 degrees. The throat on the wheel was already large enough to reach into the cab from any of the door or window openings. I found that moving slow, and precisely was the key, constantly keeping the body of the English Wheel in the same plane as the panel you are trying to straighten. Normally with an English Wheel, you move the piece you are trying to form, and the Wheel is stationary. With this setup, you move the Wheel. I only used the wheel to "finish" panels that I had hammer and dollied back to "close to straight" first. Although a bit tricky, I was VERY pleasantly surprised at how well this worked. I did end up with a few areas that I needed to heat-shrink, but in the end the combination of heat-shrinking and the wheel worked well considering the massive dents that I started with. The cab on my restoration project '58 is now MUCH straighter than my daily driver '56!

    As far as the hood sides go, I think the English Wheel is great for curves. I've never tried to take something that is warped back to flat with mine, but I bet that it would be difficult.

    Comment


    • #47
      English (salt lake city) Wheel

      Mike, necessity is the mother of invention. Great job on the wheel alteration to get a specific job done. The wife and I are on vacation in Idaho right now. Drove through Echo Canyon and Ogden on the way here. You are doing a fabulous job keep up the good work.

      Comment


      • #48
        Idaho

        Hey njjim!

        Sounds like a great trip. Are you visiting the Tetons, Yellowstone, or both while up in ID/WY? Beautiful country.

        Comment


        • #49
          Speaking of the Mother of Invention...

          I "recycled" the puller that I made to remove Pinion Seals so I could get at the brass driveshaft bushing. Turns out that old steering knuckle brass cones are good for something! Easy enough to get at with the 3rd member removed, but I need to do this job on my '56 soon, so this approach won't work. One of the brass bushings had some fossilized springs from the inner oil seal embedded in it! I think somebody out there has a home-made tool to remove these bushings with the 3rd member still installed. Love to see a pic of it.

          Comment


          • #50
            Also got busy with the sandblaster today...I'm sure my neighbors loved it.

            It is almost time for some paint!!!!

            Comment


            • #51
              Pinion Seals

              Mike, all looks very well thought out. You are going to have one very fine job when completed. I liked your post about the transfer case rebuild. I plan on rebuilding the case in my 48 and the pics will sure help. I really only need seals but it is a 60 year old piece so I will replace bearings while apart. We were at yellowstone 2 years ago while here. This year just keeping around the McCall/Hells Canyon/Payette Forest/Riggins area. Love to just visit the back country. We may take a trip down the dusty Winnemucca road on the way home and make a left to head east. LOL with the paint.

              Comment


              • #52
                Originally posted by mdvberg View Post
                I "recycled" the puller that I made to remove Pinion Seals so I could get at the brass driveshaft bushing. Turns out that old steering knuckle brass cones are good for something! Easy enough to get at with the 3rd member removed, but I need to do this job on my '56 soon, so this approach won't work. One of the brass bushings had some fossilized springs from the inner oil seal embedded in it! I think somebody out there has a home-made tool to remove these bushings with the 3rd member still installed. Love to see a pic of it.


                I have a puller to remove the seal and bushing while the third member is installed.It is very simple and not much different than what you made. I will post some photos later.

                Comment


                • #53
                  Here are a few photos of the puller I made. The key to the puller is the 1.750 dia. washer with the flats . It is made so it will pass through the bronze bushing. The flats are 1.430 wide the hole is .700 chamfer is 45 degrees cut to a diameter of .875. The chamfer allows the washer to lie flat enough for it to pass through the seal and bushing . The all thread is 1/2- 13 the smaller silver nut is a self locking type . The other nut is a regular nut with a washer face. The plate goes on the face of the housing like yours does.
                  Attached Files

                  Comment


                  • #54
                    Thanks John!

                    I was having trouble thinking up a simple solution, so many thanks for sharing. This looks easy to make, and effective. I've been delaying overhauling the front knuckles on my '56 for just this reason, so no excuses now!

                    Mike

                    Comment


                    • #55
                      English wheel

                      Mike thank you for the pics and description of your work. Really helps. I have a '53 B3PW which I am going to tackle on my own. Sort of. Thanks again. Mark

                      Comment

                      Working...
                      X