Announcement

Collapse
No announcement yet.

M37 engine rebuild pix

Collapse
X
 
  • Filter
  • Time
  • Show
Clear All
new posts

  • #31
    Originally posted by carter davidson View Post
    " My end of Feb completion date I believe just went out the window. "

    It took me over 20 yrs. of very part-time work to complete my M37 restoration. Every year I told my wife that this would be the year I'd take it to the East Coast Rally but something always got in the way of that, usually being out of town for my job as a bridge inspector. The fun part was knowing that I could set a date and always revise my schedule since doing the work to the best of my ability was more important than cutting corners to meet a self imposed deadline. For me, always having something to do on my truck was as or more important than having it all done. Not that these trucks are ever done, there is always something to do.


    My resto. pix on Webshots:
    http://news.webshots.com/album/247061965WWtrqv
    Difference is that if I don't get mine done my situation might force me to be one of those people who end up having to sell off the project at a huge loss and never get the fun of the truck...

    So I have to force a shorter time line... 20 years is not an option, not even 2 years.

    Besides, I need to get it done so I can start saving disposable cash back up and waiting for a good WC53 to buy and rebuild....
    Comment


    • #32
      I never was trying to tell you what to do or how long to take doing it. What I have done should have no bearing on what you do. I was just relating my story. 20 yrs was far to long for me to like to have taken in doing a resto. but I saw the undersides of many far away bridges more than I saw of the inside of my garage. Some take months others take years and each has their own reason for doing so. I have and continue to be amazed at the rapid progress you have made up to this point and will continue to follow your posts with intrest. I hope your situation will allow you to progress at the pace you have in mind. Good luck and please continue your narative as you have time to do so. Carter

      Comment


      • #33
        Originally posted by carter davidson View Post
        I never was trying to tell you what to do or how long to take doing it. What I have done should have no bearing on what you do. I was just relating my story. 20 yrs was far to long for me to like to have taken in doing a resto. but I saw the undersides of many far away bridges more than I saw of the inside of my garage. Some take months others take years and each has their own reason for doing so. I have and continue to be amazed at the rapid progress you have made up to this point and will continue to follow your posts with intrest. I hope your situation will allow you to progress at the pace you have in mind. Good luck and please continue your narative as you have time to do so. Carter
        I know you weren't, just relating my thing to the group...

        I'll be moving ahead pretty fast once I get this flywheel housing thing settled, and a few packard connectors to get the wiring going together.

        I wish I had taken more time and pictures rebuilding things to document. I tend to to take a before picture, get so caught up in the doing, and forget to take another picture till I'm done... ;)

        Comment


        • #34
          Originally posted by jmacqueen View Post
          I wish I had taken more time and pictures rebuilding things to document. I tend to to take a before picture, get so caught up in the doing, and forget to take another picture till I'm done... ;)
          I'm bad about that too, plus I usually forget to bring it in the garage with me, then I'm too lazy to go back in the house and get it.

          Comment


          • #35
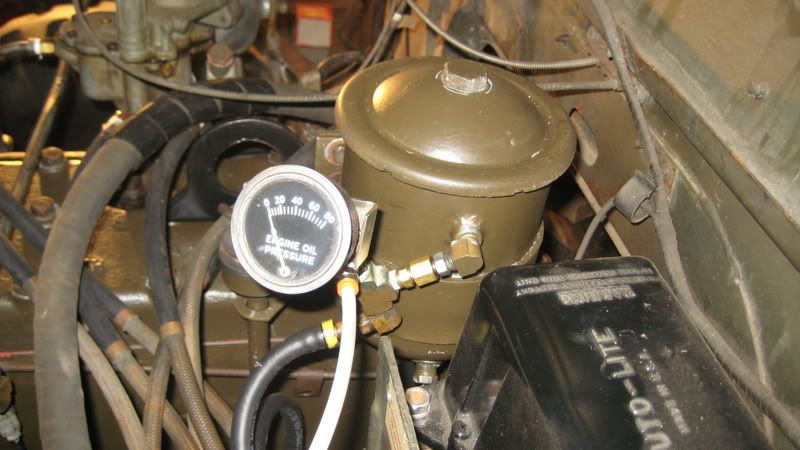
            Hello Carter I noticed in your pictures that you have a pre oiler for the engine . How does it work and how do you connect it to the engine? It looks like a great idea even if you were to just change an oil pump.
            Great job on the engine rebuild.

            Comment


            • #36
              Thanks!

              Originally posted by rix52m37 View Post
              Hello Carter I noticed in your pictures that you have a pre oiler for the engine . How does it work and how do you connect it to the engine? It looks like a great idea even if you were to just change an oil pump.
              Great job on the engine rebuild.

              The pre oiler was connected to the inlet side of the filter with the white flex line shown in this pic. The oiler was then connected to the shop air compressor through the pressure regulator and a air flow regulator.

              Webshots pics of pre oiler:
              http://news.webshots.com/album/567052133FgKHzt?start=36

              When filled with 5 qts. of oil and the cap replaced and 15 pounds of air pressure turned on, oil flowed through the system oiling the engines internal parts before start-up. Carter

              Comment


              • #37
                Hi Carter . That is such neat deal !! Thanks for sharing it. How do you know when it has circulated through the engine?

                I have an engine that is going in my truck and it has not been started in several months. I would like to build one of your pre-oilers . If you don't mind I would like to copy yours. Do you have any dimensions or special parts needed when building one?

                Comment


                • #38
                  I always used to just use a drill, hand or electric, and just pull the distributor and run a socket on an extension or a (well secured) screwdriver bit down there, whatever will mate to the oil pump drive, and drive the oil pump that way until the engine was oiled. Quick and easy.

                  That assumes an engine where the oil pump is driven by the distributor shaft though, but most engine are that way.

                  On most engines I would determine it as well oiled when I saw oil coming from all valve lifters.

                  I used to keep a few distributor shafts I stripped out of old distributors and modded so I could put em in a drill that I used just for the purpose of pre oiling engines.

                  Your really mostly concerned with getting the main and rod bearings oiled really, though I always use a good assembly lube. A good assembly lube will definitely give you several minutes of lubrication on rod and main bolts before any damage is done, about 5-6 minutes or more of running before things start going bad.. Don't ask how I know that... ;)

                  Most new engines will pick up oil and get pressure in about 30 seconds to a minute, less if you pack the oil pump during assembly...

                  Comment


                  • #39
                    Originally posted by rix52m37 View Post
                    Hi Carter . That is such neat deal !! Thanks for sharing it. How do you know when it has circulated through the engine?

                    I have an engine that is going in my truck and it has not been started in several months. I would like to build one of your pre-oilers . If you don't mind I would like to copy yours. Do you have any dimensions or special parts needed when building one?
                    My buddy Ralph designed and built the luber on my recommendation that we should use one on his engine at start-up. This luber does not circulate the oil from the luber through the engine then back to the luber, it's a one shot deal, so after the oil has filled the engine it is started.

                    Doc Dave designed a good one and posted info on this site. Search his posts or the "preluber" for other info. Another way of doing it:
                    http://www.dodgepowerwagon.com/best/prelube.php
                    I'll ask Ralph for details of his design. Carter
                    Last edited by carter davidson; 01-16-2009, 03:16 PM. Reason: Added Info Link.

                    Comment


                    • #40
                      Originally posted by jmacqueen View Post
                      I always used to just use a drill, hand or electric, and just pull the distributor and run a socket on an extension or a (well secured) screwdriver bit down there, whatever will mate to the oil pump drive, and drive the oil pump that way until the engine was oiled. Quick and easy.

                      That assumes an engine where the oil pump is driven by the distributor shaft though, but most engine are that way.

                      On most engines I would determine it as well oiled when I saw oil coming from all valve lifters.

                      I used to keep a few distributor shafts I stripped out of old distributors and modded so I could put em in a drill that I used just for the purpose of pre oiling engines.

                      Your really mostly concerned with getting the main and rod bearings oiled really, though I always use a good assembly lube. A good assembly lube will definitely give you several minutes of lubrication on rod and main bolts before any damage is done, about 5-6 minutes or more of running before things start going bad.. Don't ask how I know that... ;)

                      Most new engines will pick up oil and get pressure in about 30 seconds to a minute, less if you pack the oil pump during assembly...

                      The M37 engine has an oil pump gear driven from the cam so the drill and screwdriver method won't work and the valve mechanism won't show oil as they are mechanical tapets not hydraulic lifters.

                      Comment


                      • #41
                        Thanks Carter I will Check it out. So when the oil pan is full the engine is lubed. Is that right?

                        Comment


                        • #42
                          Originally posted by rix52m37 View Post
                          Thanks Carter I will Check it out. So when the oil pan is full the engine is lubed. Is that right?
                          We pumped 5 quarts oil from the luber into the oil gallerys, disconnected the temporary lines then started the engine. We didn't start the engine with the luber connected and pressure from it on the system. I don't know if that's the way other lubers work but that's how we used this one.

                          Comment


                          • #43
                            Same piston fracture

                            Hello, I realize this is an old thread, however, I thought I'd report the exact same psiton skirt fracture. Your picture looks axactly like ours: #6 Cylinder. Found in oil pan when we took engine apart to rebuild. We believe it was running with this piece missing. Possible causes? Hydrauliced after coolant leak from weeping plug for determining TDC? Thoughts?

                            Tank
                            '55 M37 CDN

                            Comment


                            • #44
                              I never figured out what caused the damage, most likely from something I did when taking the engine apart.
                              I do not see how coolant leaking into the cyl would cause piston skirt damage and the timing plug over #6 cyl does not pass thru a water jacket so no leaks there.

                              Comment

                              Working...
                              X