 Tweet
Tweet
wish I was still in NC but it's a bit too far gone to justify taking it all the way up to Maine and my M37 is still in the works. Good luck with the sale though, that's exactly the truck I was looking for 6 months ago before the M37 came home with me
-
-
Alex, I'm interested in the carryall. I won't know if it's possible until spring. My PW money comes from working once or twice a year at the local power plant. The job is usually six weeks but has run up to three months before.
I have no guarantee of the job or the duration so once I know where I stand we'll talk if it isn't sold. You have made the truck much more desirable than it seemed in the CL add. JimComment
-
Well, I've had some tire kickers but if its still around in the spring I would love for it to go to someone from this forum that really wants the truck for what it is. Local kid wants it to build like I am doing mine but he lacks the funds to buy the truck to start with so I doubt he can ante up and afford to buy the parts for the conversion.
Today and tomorrow off. Hoping to get some work done to my truck finally.1942 WC53 Carryall in progress.Comment
-
power steering cooler and stick catcher
This is not the best cooler for the job. The newer Ford trans coolers would be perfect and almost bomb proof but there was none in my local wreckers. I did have a real nice cooler but the lines turned out to be 5/16 instead of 3/8. So I ended up using a old style transmission cooler to cool the power steering fluid.
I built a adapter to mount the cooler in front of the radiator and a second adapter to get the fluid past the radiator. The rubber hoses could have run beside the radiator support with a very small modification, but I did not want to pull the radiator, grind out the support and weld a hose support in. I will do this mod when I am forced to pull the rad in the far off future.
The adapter for the hoses looks like a OEM piece. The cooler support is made from tube that is the same diameter as the grill bars .Comment
-
and the final result
shot with a flash , which makes the hidden stuff stick out a bit more than what you would see in normal day light.
edit; I bought some of the plastic ties that go through the rad to mount a transmission cooler, but I could not stomach punching holes through the new radiator.
last post of 2013
244000 viewsComment
-
You're not making me feel warm and fuzzy about cramming all of the stuff that I want to run on my truck into that radiator shell. Intercooler, Radiator, AC condenser, PS cooler, Auto Trans Cooler... yea... looking like I'll be hiding the PS cooler and AT cooler elsewhere.
Here is my first rendition of the down pipe. Trying to keep everything fluid and smooth. Having to build a custom firewall anyways so passenger's side floorboard will look a slight bit funky.. maybe. Will be hard to tell till the body goes back one. Focusing on the transfer case mount now. Halfway done with that. Shocks showed up so I'll be tinkering with the shock mounts next, and then some more frame modifications.
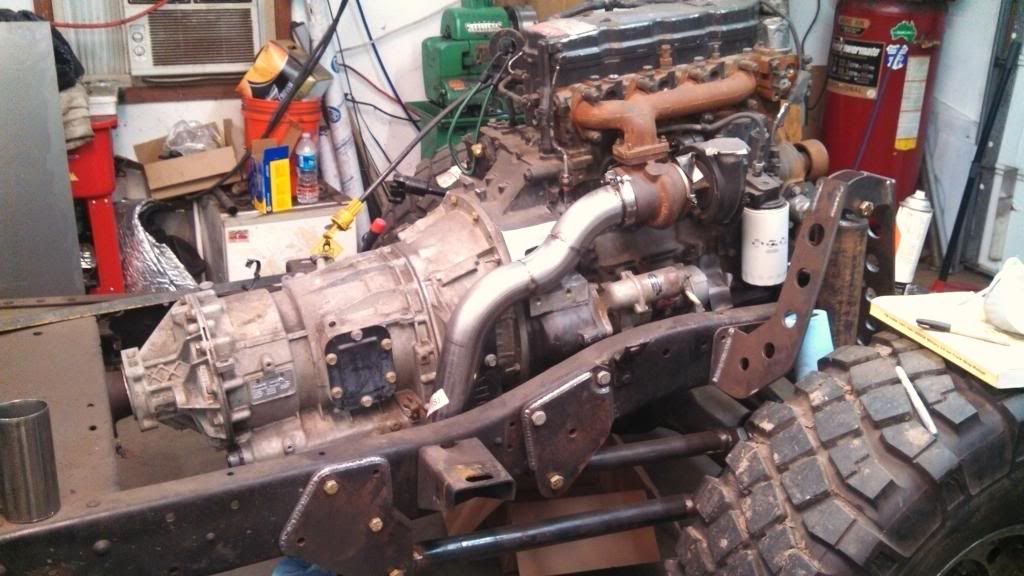 1942 WC53 Carryall in progress.
Comment
-
I plan an inch or two of body lift with my project. You might benefit from the same. Or is that impractical in your circumstance?Comment
-
Two products your PW will love
After a bit of hunting,crawling through wrecking yards and research I found this solution for custom brakes systems. A Wilwood proportioning valve.
The other product that I really like to work with but do not like the price is Kunifer or Cunifer brake line, it has other brand names as well, Easy Bend being one of them . The brake line is 88 percent copper and 12 percent nickel.
It flairs with ease. Every flair I made has been perfect and you can create tight bends without kinks. Great stuff and dot approved.
Made up the bracket for the proportioning valve from some scrap pieces I had laying around the shop . The proportioning valve has the brake light and rear pressure adjuster built in to the main unit.
edit: Alex that is a great looking exhaust pipe- looks like stainless, you going to TIG or MIG the pipe?Comment
-
-
Hey Bruce, thanks for posting about the brake lines. I am getting ready to redo mine and this was very timely. What flare tool are you using? I was checking out the 007 tool in the link you posted, looks nice.Comment
-
Double flaring tool
Funny thing is I have several of them and my favourite one is the oldest and paid the least for. It is an IMPERIAL BRASS unit made in Chicago Illinois. I found it tucked away in a old, beat up SnapOn chest, full of tools, that I bought for $160.oo . I like it better than the KD tools unit I have.
I think some of the new units that have mandrels for making metric 0 ring type fittings and high pressure fuel line fittings work better than the old style double flaring style tool. I would like one but I can not justify the expense.
In 40 plus years of wrenching I have made a few flares, even taught how to create them more than once, the cunifer tubing makes the nicest ones I have ever made. I did use the tubing in the mid to late 70s, some one scored some demo tubing to practice on but the stuff was not available any where around here. Not sure how it came about but I went looking for the stuff in Vancouver last weekend, one store had it but it was the wrong diameter. With that information I dropped by my local parts man and after about 10 minutes of looking through the books the parts guy swears and heads for the back room. He had a roll in stock and we were off to the races.
Glad to be of help.Comment
-
Very cool deal on the brake line info! Will certainly be using that on mine for sure, and the prop valve was in the plans as mine will have disc brakes and I'd like to tweak mine as best as possible since the traffic around here is terrible and the brakes need to be perfect.
The exhaust is stainless and I plan on having it TIG welded. I used some stainless hose clamps and two short pieces of old band saw blade and clamped each joint together and then walked to my buddy's shop a block away and used is Miller Syncrowave to tack things in place. Once everything is certain for fitment I'll fully weld it. My TIG ability is sub-par so I am sure I'll over bead it and then sand/buff it back. Trying to get my joints as square and tight as possible for my own ease and quality.
I'm hoping to finish up the transfer case mount this weekend. Which reminds me I need to order some hardware right this minute so it will be here in time.1942 WC53 Carryall in progress.Comment
-
How is this for a trick
Take one of those wide exhaust hose clamps. Punch 4 holes 90 degrees to each other in the clamp and now you have a nice hole to tig weld through. The clamp lines up the pipe and the hole provides access to the pipe joint and enough room for a decent tack. Simple and it works like a charm, saves hours of lining up pipe.Comment
-
Yea, I messed with that method at first. Works great on straight stuff but I was having a problem with the clamp trying to spread the joint on the inside of the tight radius stuff I am working with. The two pieces of band saw blade with a hose clamp on each end worked just as well though. And I was able to visually check more of my joint fitment for cleaning up the edges for better fitment.Originally posted by Bruce in BC View Post
I've reached a holding point with that exhaust work anyways, at least until I can get the T-case in, shocks mounted, and fuel tank laid out to see what kind of space I have to work with for sneaking it out of the back of the truck. Since I want to be able to legally tow the Airstream trailer... I have to go with regular tags on the truck. In order to go with regular tags I have to pass state inspection. State inspection requires that the exhaust exit behind the passenger compartment of the vehicle. Thus it requires I go over the axle, around the shocks and around the fuel tank... Lovely. Probably better though.
This way the noise is further back as I am planning a rather open muffler and the passenger compartment may stay a little quieter this way... otherwise not much point in running the 16 valve Common Rail engine over a mechanical pump 8 valve motor.1942 WC53 Carryall in progress.Comment
-
Exhaust routing
Out the back and behind the rear tire is what I originally wanted to go with. Too tight for me. The Carryalls stock exit was in front of the rear tire, not perfect but it does give me some wiggle room for passing inspection. I know what you mean about the pipe bends needing a different way to clamp than the single clamp and your eye will pick up the tiniest discrepancy when the tubing does not quite line up. But once it is covered with dirt you never notice it.Comment
Comment