Had another strange problem with the speedometer the other day. We had a lot of rain a few weeks ago so I took the truck to work. While stuck behind some traffic trying to navigate all the ponding on the roads I stuck the trans in it's creeper gear and was inching along when the trip odometer just started counting mileage at a good pace, even though I wasn't moving, or barely moving. Took some video to send to Speedhut and had to cycle power to the gauge to get it to stop.
They requested the gauge be sent back for testing, so had to tear it out and ship it off. They serviced it quickly but shipped it ground so it took a few days to get back. Ticket stated there were no physical problems found so they re-flashed the software and sent it back. Definitely seems better damped than it was, so far no issues but only have about 30 miles on it.
Luckily it came back just before Matthew showed up so I got it installed in case I needed to venture out in the storm, which I did, and while it ran fine, I also found some leaks. The windshield gasket has always leaked a little, unfortunately it seems to be because the frame doesn't quite fit the cab right, it's tight at the ends and a little loose in the middle, but with the glass installed and the rarity of these frames I am hesitant to try and tweak the frame fitment, I'll have to look into another solution.
The bigger problem is the cowl vent. When sitting it's fine, but while driving in the heavier rains it seems like I'm getting water driven over the seal and right down behind the dash onto my foot. I've ordered some thin weather stripping I plan to attach to the underside of the vent to see if that will seal the vent.
Worse than that I have some sort of electrical gremlin that only shows up when something gets wet, just not sure what that is. It caused all the lights to come on while parked, and a similar issue with the dome lights. Ended up puling the fuses, but once everything dried out it was fine. Tough to troubleshoot in the kind of weather that seems to cause it. Added and double checked a few ground wires just but will have to wait for another rainy day to really check, and I'm in no hurry for that.
Work on the bed continues, one fender mounted and patched, starting to patch the second fender. Then I can test fit it on the truck to check for any interferences and also figure out and drill the mounting holes to the frame.
The big issue is still the tailgate, not sure exactly what I want to do there yet.
-
Sounds like things are progressing. Any time you get frustrated, just think of the countless people (like me) that would love to have your problems. You're able to drive and enjoy the PW, unlike mine that is 1/2 ripped apart. Thanks for sharing your build.Leave a comment:
-
Troubleshooting and repairs
Driving the truck to work a few weeks ago and started smelling something burning, never a good thing but couldn't place it. A few minutes later and definite smoke, in a panic I pull over and shut down the truck trying to find out the source. Long story short I burned out the blower motor resistor pack, so I had two speeds, off and high but good it wasn't more serious.
Bad news was after contacting Vintage Air the resistor is replaced as part of the blower motor. Good news was that I was three days before the end of the warranty on the unit so they sent along a replacement for free. Replacement however was not as simple. On a bench there are 6 screws that would be easily removed and installed. That would mean draining the AC and coolant and removing the unit.
Not sure I saved myself much trying to do it in the truck. The glovebox had to be removed and the mounting bolts for the unit. A screwdriver took out three of the screws, while a fourth required some swivels and extensions with a socket bit. The two at the back however are tight against the firewall and essentially had to be remove using a bit and wrench.
Installation isn't much better. The two rear screws self-tap, which meant marking them off and pre-drilling the holes from the old to the new unit, and even at that it was a slow and difficult task to install those two screws blind. All in all it definitely took longer than removing the unit, but did save me from having to evacuate and drain the cooling and AC.
The other problem has been the speedometer. Speedhut thought it might be a ground issue, which had occurred to me too. I swapped the speedometer ground point and verified the wiring harness for the gauges, but found no problems and it didn't solve the problem.
I suspected an alternator problem, so I verified the ground on the alternator which was shared with the fan controller. So I created a separate ground point for the alternator, but that didn't change anything either. So I just broke down and ordered a rebuilt alternator. So far that seems to have helped. I've seen it blip once or twice, but it has been far more stable and the charging voltage has been a little higher.
Plus side is it's back on the road, still have some troubleshooting to do, and a few things to tweak, but little steps. Also my shrouds do seem to help as the AC has been more consistent and engine temps seem unaffected.Leave a comment:
-
We had a temporary reprieve from the heat so I tried to tackle a few issues on the truck itself. The blower motor resister went bad so I have no fan speeds. Verified it was the resistor assembly by disconnecting the fan power and feeding it 12v to the different speeds. Luckily it's stull just barely under warranty so should be replaced.
A related issue was that the intercooler on my truck is narrower than the radiator and AC condenser which allows air to bypass the condenser and go around the intercooler. At low speeds this means the fans aren't pulling air through the AC condenser and my AC suffers. To combat that I made a pair of shrouds out of some black coated aluminum plate. They fit to either side of the condenser and block off the sides. Seems to do the job pretty well. Only downside is I had to remove the horns so need to locate a new spot for them.
Still have an electrical gremlin with the speedo to chase down too. It would randomly show speeds I wasn't going, even sometimes while sitting still. Determined that it has something to do with the radiator fans, coming on, but too hot to try and troubleshoot right now.Leave a comment:
-
Slowly working on the bed. Lots of other things going on lately, and the heat doesn't help.
Currently working on the fenders. They mounted to a lip that I cut off when I removed them, so the goal was to recreate it. The fender then spot welded to the lip. Took some thicker metal bar stock and tack welded it in a few spots around the finder opening. Then I could cut a strip of 16 ga. steel and clamp it to those bars adjusting to get then curve correct. Then I went and spot welded the strip in place to the bed side, working from one end to the other so I could tweak and adjust the shape to follow the existing opening as I went. Once the shape was locked in I could cut the supports away and finish welding the strip in place.
Next is trying to fit the fender back in place and weld it on.Leave a comment:
-
Managed to fit all the panels, most were a little tight, and the bed isn't perfectly square, so a little grinding and fitting was needed. Want a little extra space to allow for the liner too, just not sure how much. Might need to have it sprayed in two sessions so I can re-fit the panels once the bed floor and sides are done.
Then I could clamp the panel in place and drill pilot holes for some bolts. I drilled the holes out, ran a bolt in and used some square nuts on the back side which I then tack welded into place.
Used a stainless piano hinge for the box top. I drilled and tapped holes in the top rail to bolt the hinge to the bed, then riveted the top of the hinge to the plate to make it a little more tamper proof (temporarily for now).
I ordered a set of gas struts and a hand-full of different brackets to mount them. The strut I ordered is strong enough I should only need one. The bottom bracket I bolted to the framework the top I will weld to the lid though it will have to be protected for blasting and painting.
To secure everything I ordered a few sets of simple key locks and installed one at each end that latch under the angle iron on the front. Not as convenient as some releases but simple and I'll run a gasket underneath for some water resistance.
I have an idea for how I'm going to do the battery door but I'll show that once I get the details figured out.Leave a comment:
-
Ha! Yes, on my way to work too. Had a buddy call me the other day on my way home because he had seen it running down the road in front of his work. Slowly getting used to driving it, and more confident in its operation. Like Bruce it's also a good chance to work on all those annoying little issues, and with that 4BT under the hood it will show you anything not up to spec!Leave a comment:
-
Nowhere to hide now!
I got this text message this morning! A buddy of mine spotted you! He works for Weeks Marine over in Ptown so I guess he saw you on the way into the yards. Nowhere to hide now!
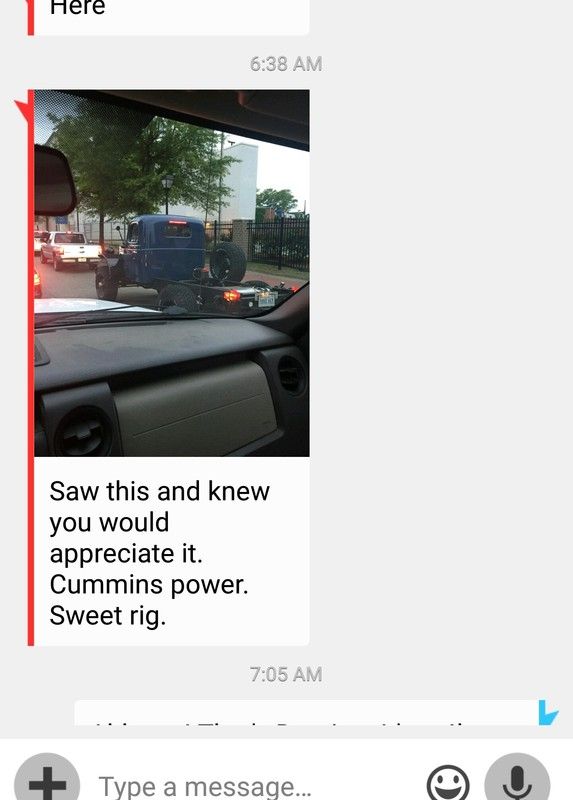
Leave a comment:
-
Good find on the inline injection pump 4bt. Some fairly simple mods and it will rip right down the road with a broader power band. Governor springs being the biggest help.Leave a comment:
-
New Shoes
Took a little extra time for the shop to get the right adapters to balance them but finally got tires mounted to the VPW rims. Just wasn't sure about 37s so played it safe and went with 35x12.5 17s in the All-Terrain KO2's. Definitely rides better and the speeds are better, but thinking the 37s would have been the better choice. They'd be close with the rim offset but shouldn't rub and would help with gearing and cruising speed. Got it out somewhere I could get some speed and 55 is about 1900 RPM, 60 pushes just over 2000. Of course they would also have been about $300 more and would have hurt acceleration even more. The 4BT has a lot of torque but it's in a very narrow band so acceleration is slow but inevitable. I notice a lot more movement from the EGT gauge with these new tires.
Slowly working on the false bulkhead in the bed in mounting plates and the lid. Pics to follow once I have something worth showing off. Otherwise troubleshooting issues on the truck itself.
Checked all the fluids and they all looked fine. Had a little weeping on the transfer case which ended up being the fill and drain plugs not quite tight enough. Axles levels were fine though this last drive showed a little leakage from the axle vent on the rear axle, so need to check that for tightness as well.
Tracking down some of the various rattles and squeaks, mostly in some of the door parts. Once I mount the interior panels it should help, otherwise a few pieces of the "fuzzy" side of some really good adhesive Velcro I have for the sound deadening worked well as a noise isolator.
Tweaked the passenger side wiper arm to get rid of a dead spot in the sweep.
Tracked down an issue with the LED bulbs I was using in the cab side marker lights, seems to be the way the bulb is designed so for now back to the old regular bulbs.
Re-wired my fog lights so they're tied to the rest of the lighting and can't be left on accidentally. They're LED so it wouldn't have been a huge problem but could see myself forgetting to turn them off, was just not good thinking on my part anyway.
The cruise control module isn't working, found one issue with the way I had wired it to the brake light switch, but that didn't fix it and troubleshooting is a two person job so I'll have to come back to that.Leave a comment:
-
Yea, I had it tacked in place before I decided that's where I wanted them, but that C-channel is really thick, I had a template, and my plasma would have probably done it but would have been pushing it for a clean cut. It was tedious but worked out well other than the rotary burr makes a giant mess of tiny little razor blades.Originally posted by Alxj64 View Post
I appreciate the offer, you've got plenty on your plate though. It would give me an excuse to come down and see the progress, I'm sure pictures don't do it justice. Usually I get impatient and just start doing it. I may bug you soon though, I really need to work on coming up with some sort of tailgate assembly, can't figure out what I want to do though.
Thanks, it's not as fancy as what you've got going, but I don't have quite as many cool toys to do it with!Leave a comment:
-
Man, in the future, for something like this... Hit me up. I can throw the piece of channel on the table and put the drawings in and just hit print and can burn them out exactly where you want them, to the exact size. Thats how I did the ones in my trailer deck extension.Originally posted by Desoto61 View Post
Looks good man! On par with the rest of the build. Tons of details in everything!Leave a comment:
-
The original rear bumper was a piece of 5" C-channel, there was a large steel plate and a pair of eye-hooks in the center and at one point it had been used hard enough to bend and twist the whole assembly into the thinner steel on each side step.
I ended up cutting the whole thing away as there was no reasonable way to straighten it. The local shop didn't have any 5" c-channel but they did have an almost perfect length of 6" channel, so I went with that instead. The advantage of the little extra height is that I decided to use that space to hold the rear tail lights.
The original lights were mounted on the side of the bed in pods but like this smoother look and should make it less likely to whack your shin off of the lights if you're using the side steps.
Cutting the holes was a slow and tedious process with a hole-saw, angle grinder with a cutoff wheel and a burr to fine tune the size. The lights are standard gasket mount oval truck units. There are lots of different designs and they are readily available and fairly inexpensive. The turn signals are a chasing type which should look cool, and of course they're all LED for long life and reduced power use. I've picked up a set of LED bar-style lights to mount under the bumper as reverse lights. I may wire them up to a switch to come on with the bed lights I plan to install as well.Leave a comment:
-
With the bed floor in it was time to start on the false bulkhead/toolbox at the front. Had some angle iron cut and welded it in to create a box. Could have easily just built it with the plate steel but wanted the framework for both strength and to make it easier to blast, paint, and coat all the surfaces.
The bottom corner will house the battery and air compressor for the locker, as well as a small fuse panel for some bed accessories. The rest will be a tool box/storage space.
Once it was welded in I had some diamond plate cut to cover it all. I'll drill and bolt it all in place. The plan is it will get blasted and line-x'ed front and back, so bolting it in place will make that much easier to do.Leave a comment:
-
Thanks, the cut was not quite deep (tall) enough, so at some point the front axle hit the pan and kinked the brake hose on that side.Originally posted by jtearle1288 View Post
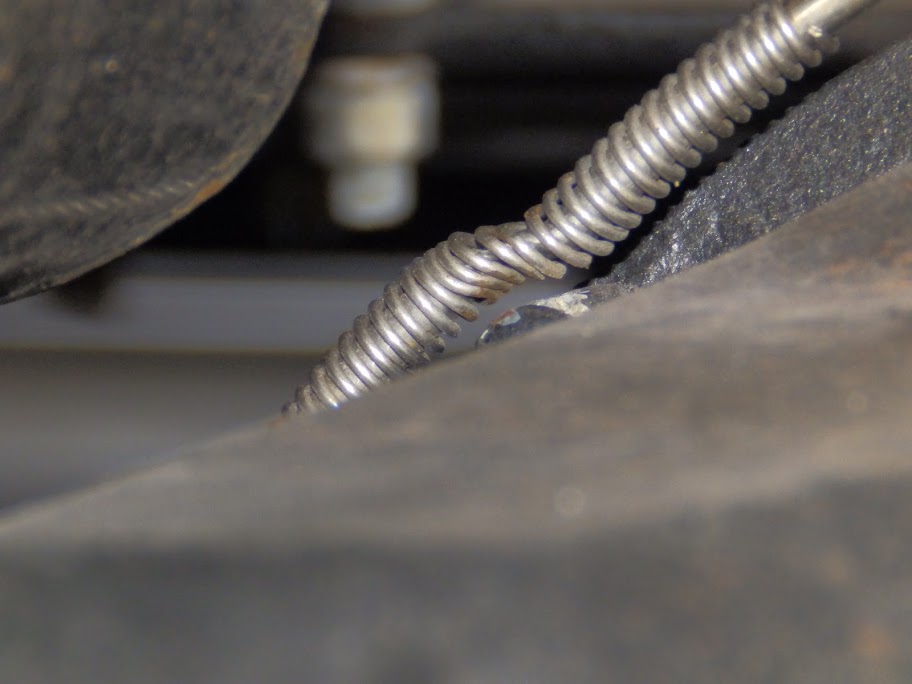
I installed a new line and ran it more to the rear and tighter to the housing so that it can't get pinched like that, but it still means the cut needs to go higher toward the engine block. Now that I have a TIG welder it should go easier, but not looking forward to having to drop the pan and do this all again. I've also noticed that the area behind this looks like it's just rubbing on the axle housing. Should be OK, but might take a body hammer and "massage" it slightly while I have it off to add some additional clearance.
I didn't have leaves added to the front pack, but I did have the front springs arched an extra 2" with the idea that the additional weight (which isn't huge) with the stock springs will make the front axle a little softer, which is a very relative term, it still rides like a skateboard. I have the axle bump stops installed, so the extra leaves don't really matter, the only difference will be how easily it can flex to that position.
Look forward to following your build, good luck!Leave a comment:

Leave a comment: