Announcement

Collapse
No announcement yet.

The WC53 Carryall thread .

Collapse
X
 
  • Filter
  • Time
  • Show
Clear All
new posts

  • And here is the ding

    IMG_1339.JPG
    This photo does not show how bad the hood is sprung. The hinge has close to a one inch curve in it and the rear of the hood is squashed or sprung out about one inch. This is going to take some serious tweaking just to get it to "sort of" fit. All four corners of the hood have issues. I changed my hood lacing to the original style. I will make some sort of hood prop that will support the hood and not load the centre hinge pin.

    Comment


    • Hood Prop

      The 1/2 ton WCs use a hood prop that fastens to the stay/rod between the cab and the radiator shell. It takes all of the stress off the hood hinge, and is easy to operate.
      Greg Coffin
      Unrepentant Dodge Enthusiast

      1951 Dodge M37 - Bone Stock
      1958 Dodge M37 - Ex-Forest Service Brush Truck
      1962 M37-B1 - Work in Progress
      1962 Dodge WM300 Power Wagon - Factory 251, 4.89s
      1944/1957 Dodge WM500T 6x6 Power Wagon - LA318-3, NP435, 5.83s, Power Steering, Undercab Power Brakes
      1974 Dodge W200 - 360/727, Factory Sno-Fighter Package

      Comment


      • Originally posted by Bruce in BC View Post
        [ATTACH]10257[/ATTACH]
        the solution was simple, except I had to order a whole box of screws to get sixteen fine threads that I needed.
        Man I could have sent you some! I have a whole box full as well for exactly the same reason.

        I also did the prop rods on my truck. I may build something longer eventually, as I'm always nervous about folding the hood and using the prop rod on the painted surface, and it's not very tall otherwise. But it solved my problem which was that I ended up installing the cruise control motor where the original props needed to be. Plus the other benefits, my passenger side is also tweaked slightly.

        Comment


        • Another WC53 carryall for sale

          On Craigslist. $12500 http://losangeles.craigslist.org/ant...093662161.html
          Attached Files

          Comment


          • And now for the DUH

            Got the covers on the valance and the over head console installed with the monitor.
            Typically the front image is upside down and the rear image is right side up. Changing the position on the front camera would take one to two hours. The grill would need to be removed and a new bracket welded in place. Also the image has a grid or lines superimposed on top of it. I have no directions on how to eliminate these annoying lines. The last part of the DUH is I forgot to notch the console for the roof fabric trim. Just a bit tough to do that when it is in place.
            IMG_1341.JPG

            The console is wider than it looks. It is as wide as the waterfall in the dash. Perspective is off in the photo and makes the console look out of proportion.
            Instead of welding up the switch holes in the wiper covers I glassed them over on the inside. This is a tacky way of doing it but will make it a simple matter to add the switches, if I want, at a later date. I little pressure and the glass will pop off and the hole will reappear.

            Comment


            • Body mounts

              I know this has been discussed some before on ts thread,mbut I need some help with concerning the body mounts for my carryall. I still have all the factory mounts in place, but my truck had no rubber left anywhere and most of the body bolts and floor crossmembers were gone. So here are my questions that I hope someone can answer:

              What was the thickness of whatever rubber piece was between the body and the mounts?

              We're all the rubber pieces the same thickness?

              Are the body mounts supposed to all be on the same plane?

              Thanks in advance for any help you guys can give.

              Bryce

              Comment


              • the "plane" you're referring to is known as datum. Use a straight edge on frame and where under the body and compare the dimensions of both. I used GM body insulators and grade 5 bolts. GM part# 15899719. If you go this route the holes in the frame brackets will have to be opened up.

                Comment


                • Body shim thickness

                  I found the original specs at one point and off the top of my head the ones from the doors back were 3/8 thick.
                  I had an issue with the oak blocks in the front , two inches, and 1 7/8 inches came up. I ended up using some late model Dodge 3500 blocks that I found in a pickup bed . No clue if they were for the box or for the cab, I think they were the cab mounts.

                  The water line to my house sprung a leak for the third or fourth time in 2 years.
                  Was going to cost 4200 to replace it, but the plumber was so slow that I did the job while I was waiting for him. Took 10 to 12 days, 8 to 12 hour days. So no Carryall work got done. My cost came to 900. I promptly went out and bought some Eastwood sound deadening material as a reward for doing the water line.

                  I opened the door to the garage for the first time in two weeks this morning.

                  Comment


                  • Time marches on while the carryall progress crawls

                    Torqued down the U bolts on the front axle today. 90 ftlbs. Then the excess was cut off the top of the bolts. As things got torqued down they got marked with a yellow paint pen. Centred the steering while I was at it and torqued down the dana 60 king pin bolts. Got all four tie rod ends adjusted too. Still a bunch of little stuff to square away under the front end but it feels good signing some things off.
                    There was a mess of hard to get carryall parts on ebay this week. Rear hinges, gas covers, floor plates, but all that is left is four window winders with springs for $200 bucks. That price seems fair to me. Got to love the used window crank handle listed for $175.00 and if you look deeper there is a NOS one for $20.00.
                    Here is a link to Dan M's latest build….a Carryall.
                    https://www.youtube.com/watch?v=TFo_u1k6mno

                    take care out there.

                    Comment


                    • progress and success

                      Managed to get the doors to lock from the outside. The solution was simple, the execution took some time but for a change it was challenging but not frustrating. the door tumbler assemble is a cam lock. 5/8 deep. I ran a rod from the cam arm up to the lock arm on the door latch. Basically the the lock on the latch prevents the latch from opening or moving, I made this L shaped arm and it drops behind the jaws of the latch and prevents any movement. I used the plastic parts from a newer vehicle to lock the rods in place. There are a few rods and parts to get this to work and the door does not lock from the inside at this stage. But it is cheaper than Westcots solution.
                      Attached Files

                      Comment


                      • That was one thing I never tackled when I redesigned my latches. I have an interior lock pull, and a power lock actuator, but didn't build in an external lock linkage. I'll have keyless, but have thought I should probably rig up some sort of external unlock mechanism just in case. Just one of the many small tasks to do.

                        Those little plastic clips are great for their purpose, and easy to use.

                        Comment


                        • Messing with the tail gate.

                          rebuilt the latches for the tailgate. They are not adjustable as far as I can tell. The issue is there is was too much distance from the body mechanism and the latch on the lift gate.
                          There is enough slop that I can get my finger in the gap when the lift gate is closed .

                          So the only solution I could come up with was to make new parts for the lift gate. The originals are cast, the new ones are steel. I can weld on them if necessary to make adjustment if they are too sloppy and shim them if they are too tight.
                          Attached Files

                          Comment


                          • So yesterday and today I counted trips

                            I decided to count trips in and out of the cab. I needed to make a latch for the front window and there are no Carryalls or early Dodge trucks at the wreckers.
                            It took 67 trips in and out of the cab to get the latch done from start to finish. The bracket on the window frame has curves , steps and bends in it. I needed to drill holes in the bracket and tap a hole in the centre divider. The bottom part of the latch, that part that attaches to the dash board, needed to be built up. Sorta, almost , kinda looks like it belongs there. It works, at least it works in the garage. No telling how it will work on the road.
                            Attached Files

                            Comment


                            • outside mirrors

                              The tapered bars are front bicycle forks and the mirrors are some thing I found at a yard sale. Both mirrors were convex. I took the driver side mirror to a local glass place and had the convex pulled and flat mirror put in. The view from the seat seems to be fine with both of them. The arms were made long before the seats ever arrived. Nice to have something go smoothly.
                              Why make them? Because I did not know of a source at the time.
                              Attached Files

                              Comment


                              • So I haven’t been in this thread for a while, and my apologies, however not a lot to update on my Carryall sadly. I’ve been trying to get my trail-toy fixed so that it is no longer just a lawn ornament like it has been for most of the summer as I have a couple of big wheeling trips planned for the fall… That project, however, has taken far too long due to traveling for work, helping a friend build a Mega-Truck, and then just last weekend our group lost a good wheeling buddy that was also one of my college roommates for years, and he has been living just a block away from me for the past 2 ½ years. He was one of those guys that you expected to be camping with and wheeling with and turning wrenches with till you both were 100; instead we lost him in a bad fall during a hiking trip with his younger brother. One slip while climbing to get a vantage point and down he went. Its been pretty devestating and quite demotivating. That being said, not much has been done to my Carryall as he was over at my place drinking beer and mocking me all the while I toiled away. He was a brilliant mind as well and was always great for bouncing technical ideas off of. I am planning on getting back into this thing hot and heavy this fall and winter and hopefully hearing if fire up before Christmas.
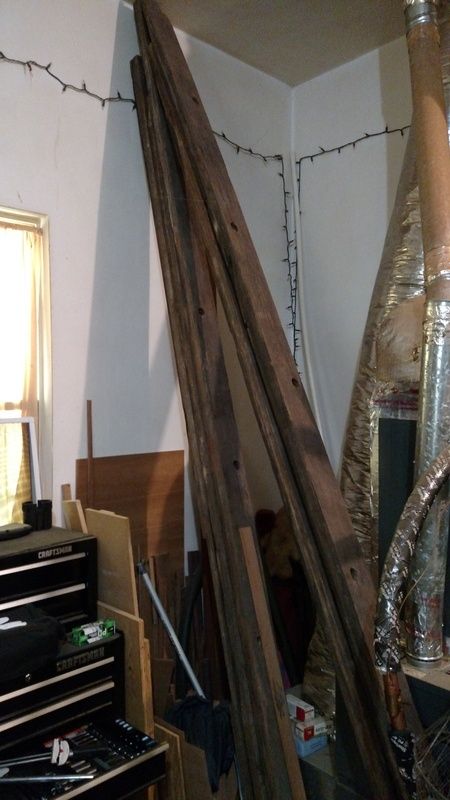
                                There IS one big thing up my sleeve for this truck that I haven’t fully divulged yet. And from what I understand, I have pretty much the last of the source of it, so I can’t screw up or I've ruined quite a bit of something good. My father in law is a very masterful wood worker and he has "jumped onboard" to help me with the floors of the truck.

                                As we all know the, floors of these trucks were made of out teak...


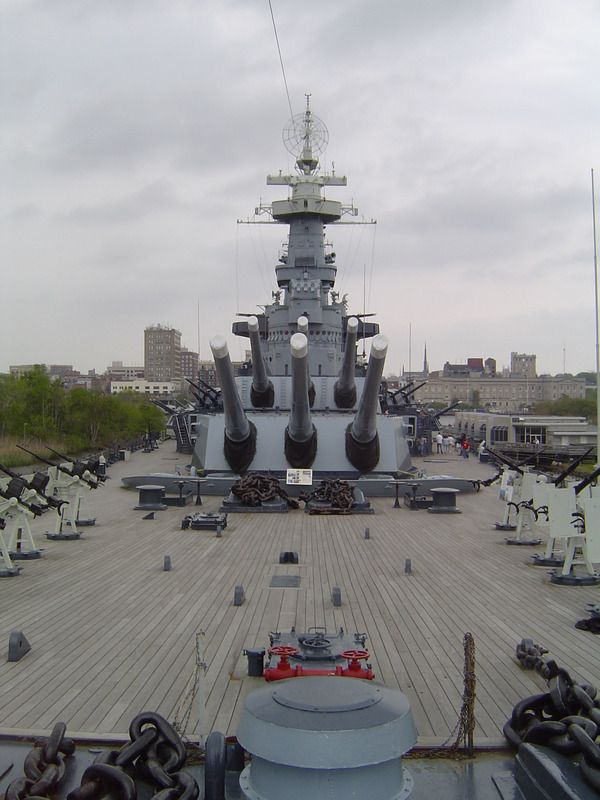
                                Well, something else during the war used Teak boards. Something much larger, and something much more destructive. Battleships… And there is one in particular that was the most heavily decorated of them all, and is actually moored within a few hours of my home.


                                The USS North Carolina (BB-55).
                                https://en.wikipedia.org/wiki/USS_North_Carolina_(BB-55)

                                In the past two decades, a lot of restoration work has been done to the battleship; including replacement of the deck. The majority of the deck boards were in very bad shape and many were damaged during the removal process. Much of the damaged portion was cut into sections and sold as memorial pieces, or donated to various WWII VFW Halls around the country. However, a good bit of the fair and good condition boards were sold as "reclaimed historic lumber" to raise funding for the deck rehabilitation project. A fair amount ended up being available for purchase by the general public…. And I think you know where I am going with this.


                                So umm, yes… It was quite expensive… quite quite expensive… but I will have, and will be installing, original teak deck boards from the surface of the most highly decorated Battleship of WWII, that I have personally walked on and toured the "Museum" in Wilmington, NC. If you ever have the opportunity to visit that ship, it is simply an amazing place. I wish I had more time to have spent on it but I was in town for a wedding. When my Carryall is done, I can garuntee you that I will drive it down there and take plenty of photos. Additionally I am having a brass plate installed near the rear gate that I aquired from a “collectors” sample of the teak sold by the museum to identify such material in the back of the truck.


                                I've been sitting on this material for some time now, and I contacted my source recently and he says its all gone and I actually bought the largest order of what he had on hand. I'm sure some folks may resell some of it, and I believe you can still buy some off the Battleship California also, but this is going to be epic and is one more push for me to get this truck done.
                                1942 WC53 Carryall in progress.

                                Comment

                                Working...
                                X