Wow, that skid plate looks like it weighs a ton! Of course, the stock one in my 6x6 does too.
Preamble and question about the brakes: It appears that you will have the rear master circuit feeding the prop valve to the rear brakes. When I was setting up the power brakes on my 6x6, I wasn't sure which master circuit was supposed to feed which axle. The info I found on the internet generally said that the front circuit should feed the rear brakes, and the rear circuit feeds the front brakes. The reason given is that the front circuit builds pressure just before the rear circuit, and you want the rear brakes to engage just before the front to keep the vehicle from yawing while braking. This tends to be confirmed by the fact that the rear reservoir on disc/drum master cylinders is bigger, because the front discs consume more fluid as the pads wear.
But several sites (Helitool for one) say that it doesn't matter which circuit goes where, so I'd like to get some clarity around this. Do you have any input?
Nice work as always!
-
I also mounted my brake prop valve to adjust my rear brakes, it is just in an easy spot under the MC and hydroboost unit (thats not the correct hardware, just mocked in). I also cleaned out the inside of the truck and started closing out the rear floor patch and getting the fuel filler neck re-built and installed. I am trying to avoid having that access panel in the rear floor if I don't need it. My father-in-law and I are going to start on the floors in a few weekends too so I am starting to get my seat positions laid out. I'll be building my own seat frames and having the cushions made from just nice high end foam.Leave a comment:
-
Ugh... I've been gone for a bit again; sorry guys.
Bruce, nice work on the shroud and on shortening the engine some! Nice trick you've got there sir!
I've been slowly pecking away at my stuff again. I got the tank skid mocked in and it appears to look correct in its home. I am getting the tabs made for hanging it.Leave a comment:
-
I'd agree with just about everything Greg said and I'd add that they did build it for a customer, who might have specified a few of the items we didn't like. Not knowing how much influence they had in steering the customer I'd liked to have seen the fueling, tail lights, bumperets lift gate latch fixed.
Based on this video I'm a little less down on Legacy Trucks than I had become over in recent months.
I've seen a lot less Dodge Power Wagon stuff built by others with ls power that I'm heat broken to see the "press" glorify and push on the public. At least it looks like they kept the trucks intended use in mind in this build and I liked they prefer keeping the trucks original frame.Leave a comment:
-
Overall I think it's a good truck, but the beauty is in the details, some of which I think have been lost on this truck.
- I've always disliked electric winches on WCs and Power Wagons. They look small and weak and don't fit the look of the truck. And there is nothing quite as nice as a factory front bumper. Electric winches are hard on the electrical system, and tend to overheat during heavy use. A hydraulically driven Braden MU2 would be a much better choice in my opinion. Easy to operate, easy on the engine and electrics, and bulletproof.
- The LED tail lights look out of place on the truck. It's easy to retrofit military tail lights with LED bulbs and full-view lenses.
- All that expensive rear sheet metal deserves some protection. I would have left the bumperettes in place and mounted M-series tail lights outboard of them - in fact that's what I did on my 6x6.
- An original latch on the lift gate is easier to operate and is lockable. Padlocks are going to be noisy and beat the heck out of the body when they are off-roading. I like the cable stays on the tailgate, and the gas struts on the lift gate.
- Having the filler neck buried under piles of tools and parts is going to be a big pain in the neck. Get a locking gas cap and be done with it.
- I like the fender mounted air cleaner.
- The E-brake cables are going to get snagged on something.
- Battery placement is good.
- Compressor placement will be noisy when driving.
- Welder placement is bad, or at least cover it with the glove box door!
- Paint - ick!
- The seats are nice. I like the integral shoulder belts.
- Anyone notice how they covered the Carhartt emblem on Winslow's vest? Corporate BS.Leave a comment:
-
Jay Leno carryall ......... $250,000 bucks
I could go on and on about that truck but lets chew on a few details.
(1) Air filter on the fender - I do not like it but I may end up going the same route - I have moved my overflow tank because I want room for the Donaldson filter. May go under the hood, may not. That clear air filter thingie at the top, I was already looking for one after seeing how well they work.
(2) roof rack - am thinking about it, but I wonder about wind noise and what it would do to the fuel milage. But the design is close to what I have on paper.
(3) Odd choice of wheels, not the easiest wheel to replace in the outback. A steel wheel that you can beat back into shape might have been a better way to go. I do not think the rims are DOT approved, not that it matters much. Hutchinson makes a wheel that looks military enough to fit on the carryall.
(4) Fuel loading inside a vehicle? Honestly this takes up too much space and it smells. Some of the old parcel vans took fuel this way, PITA.
The number of not new parts in this vehicle is interesting. 4bt, NV4500 and the rear axle are not off the shelf new parts. The newer corporate 14 bolt disc brake rears have the emergency brakes inside a drum, the ones in the video look like GM callipers off an Eldorado - I have the same set up but the cables are higher.
Interesting that the drive train is close to mine except I have air bags in the rear and can adjust to any weight load, I have ARBs all around and twin transfer cases a bigger winch and a nicer front bumper. Given the choice between the two trucks I would take mine - the ride is much smoother and the build details are a tad more polished. The on board welder is the one thing my truck is missing, the Moal brackets for the gauges are a nice touch, but getting a bit boring, I have seen so many.
I will take $250,000 for mine but that makes Alex's build worth at least 50 grand more.
Kevins truck should be on that show - now there is a sweet build.
Paint ? Those graphics are gross. A curve in that straight black line and a transition colour would have cleaned it up quite a lot.
Tires - Funny I am running Toyos on my rig. 35lbs seems to be hard enough on the high way, 18 -24 lbs on dirt and 10lbs in the snow.
thanks for the video link.
"only 8000 were built" Nope records show 8500 and I have a body number with 9500 on it so more than 8000 were built.
edit : I like the sound of the 4bt - I wish they had better detail shots of the engine compartment.
take care
BruceLeave a comment:
-
Legacy Caryall
What do you guys think of how this build turned out. I thought this was the right place to post this.
https://www.youtube.com/watch?v=EXXLGjc4gD4Leave a comment:
-
In my years back in the automotive aftermarket, late 90's they made these hose attachmants that consisted of several wire stainless rings all in a row with a single piece of stainless flat stock welded to the sides. "I will search for a name and a photo, when im not on cell phone"
They were made for 1/4 inch rubber hose on up to i believe 3 inch. The purpose was you could take any piece of heater or flexible rubber hose and make it bend in whatever angle you needed the hose to be without kinking it.
For the longest time I wouldnt stock them at the part store, to hokey for me. Until I broke down and ordered some for a guy and saw them installed. Quite brilliant really. I am not sure of the are still being made but oil lines, fuel lines, heater lines, radiator hoses could be virtually made out in a few seconds to fit any application.
These hose posts have made me think of these. I will research these some more.Leave a comment:
-
Shim or bush the rad hose
I thought of that Jim. The elbow is for the lower rad hose. Things are tight down there. If I put in the hose and the shroud, fan and overflow tank I will have to remove all of that to get at the lower hose, and drain the coolant. That is a messy job. I will try waiting. i cut the hole for the fan in the shroud today, then tack welded in some nuts for the fan. Built myself an over flow tank, I want to clear the area where the old steam engine tank is mounted on the fire wall. The new tank will be mounted on the passenger side of the fan shroud - I just need to come up with a mounting bracket. Will fire off some pictures in the next day or so.
take care out there
Bruce
getting close to 750,000 hits biggest thread on PWA :)Leave a comment:
-
I didn't get what the elbow was for, but if its no too hot or the pressure is not too high.. Couldn't, for now, sleeve it with a piece of 2.25 radiator hose? Just to get you up and running before the replacement arrives.
I'm thinking this way 'cause I'm in the garage making up kludges to get stuff running with what I can get my hands on, today.
-jim leeLeave a comment:
-
OH pooh!
So I finally get my Silicone elbow and do a test fit. The hoses line up and I will not need to notch the radiator fan shroud. But the elbow is 2.5" instead of 2.25".
Not sure how that happened but that means I get to wait another 3 weeks for a new elbow. I think what happened is this, when I punched in 2.25" a whole list comes up and 2.5" elbows are mixed up in that list. After looking at a few I selected the wrong one. And NO, my local shop could not get the right one from any of their suppliers, including their turbo supplier.
That NP205? The front yoke is a Dodge yoke on a 32 spline Ford output. The rear is a Ford 32 spline output and Ford yoke. The flange and speedo drive are Chevy, with the Chevy drive gear mounted to the Ford output. The case is a Chevy, a couple of the covers are Dodge. I needed to do this because the Chevy case was a 10 spline unit and a slip yoke, so I used what I had to get a transferase that would work for me and keep the costs down.
Stupid silicone elbow.....stupid ebay sale site, stupid programmer........stupid me for not catching it :)Leave a comment:
-
old tech double transfer cases
Married a NP205 and a NP203 together. I had a serious issue with the NP203 although it looked great inside the chain was stretched and finding a new one was way too expensive. So I ordered a kit and will join the two transfer cases together. Gives me almost 4 - 1 ratio when I need it. But a NP241 case in place of the NP203 would be a better way to go. At present the parts are going in the trash truck. long term they may end up under a M37.Leave a comment:
-
With all the talk about the rivets Alex, have you tried to just press them cold? I realize some pieces you couldn't get in a shop press but some of the things shown you could. I would think with 3/8" rivets it would not be that bad. We did sickle bar sections on mowers and combine cutter bars all the time with a portable press/remover. They were 3/16" rivets as I recall and they made them look perfect and hold great. I've used my shop press to heat form and cold press stuff with good results. I may have to make up some hardened dies and try it.
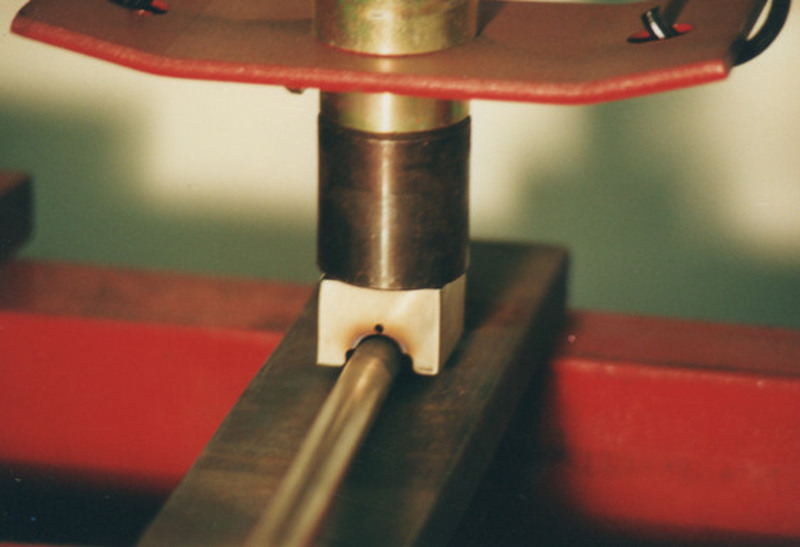
This is pressing a cowl support bar to look like the original. I'd heat the bar and then press it quick. Took about 2 or 3 heats as I recall.
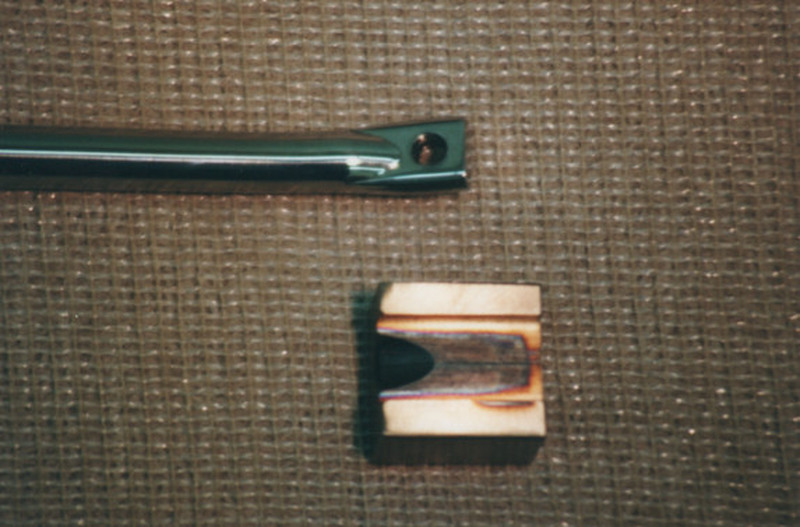
The result and you can see how I ground the hardened tool steel forming piece.
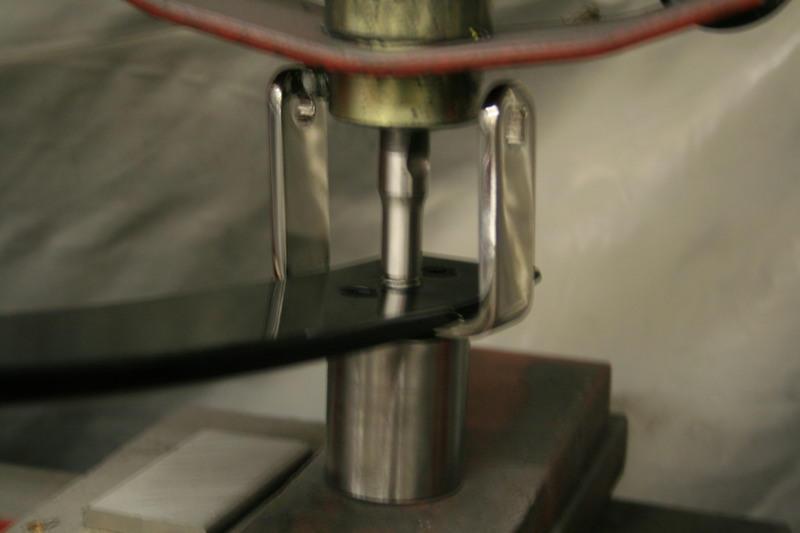
Pressing the rivets I made in for the leaf spring keepers.Leave a comment:
-
Look what followed me home
was out hiking and found a rusted out and burned wreck dumped in the bush.
Free switches for the Carryall.Leave a comment:
Leave a comment: