If this is your first visit, be sure to
check out the FAQ by clicking the
link above. You may have to register
before you can post: click the register link above to proceed. To start viewing messages,
select the forum that you want to visit from the selection below.
Power Wagon T-Shirts are now available for purchase on-line through the Store.
They are only $15.00 each plus shipping.
Shirts are available in sizes from Small thru 4X and are Sand in color.
Design/Logo is printed on the back of the shirts and the front is free of any designs.
But chain tends to rattle a bit . You are building a hybrid , the truck is a distinct extension of your character , a bit of rolling art , a statement perhaps a bit tongue in cheek . Because it is not a 100% restoration you can use whatever suits you , there ain't no right way . gotta run - going on a little hike .
But chain tends to rattle a bit . You are building a hybrid , the truck is a distinct extension of your character , a bit of rolling art , a statement perhaps a bit tongue in cheek . Because it is not a 100% restoration you can use whatever suits you , there ain't no right way . gotta run - going on a little hike .
Very true. I kinda like the idea of the cable inside of the canvas, or maybe leather sheathing that way I can adjust them to share and exactly even load before having them crimped with the ferrles.
Okay, here I am going to show my ignorance... Blast and epoxy prime... Blast, then use the body filler, then epoxy prime? What order?
When it comes to any form of painting, other than rattle can, I am going to have to sub that out. I know its going to add a huge cost to this project by having to outsource paint, but thats something I simply don't have the space, talent, or equipment to even begin to undertake. I am going to put a sound deadening layer on the inside of the panels of the gate and it says to try and apply it to bare metal rather than a painted surface... Its the nice Second skin, stick on heat and sound NVH (noise, vibration, Harshness) isolation stuff. Should I still have the gate primed first? I still have to apply the insulation, to both outer skin, and inner skin, and then weld the inner skin onto the frame... How/what is the best way to protect that internal side from rust? Thoughts?
There are as many opinions on this as there are belly buttons . if you are using any talc base filler then the order of application is epoxy , mud , and seal in epoxy . Any one who says otherwise is wrong , this does not mean you can not go mud then epoxy but in the long run the sheet metal will get rusty underneath the mud . Talc holds water .
Allmetal or filler that consists of metal as its filler material does not hold water - you can apply it directly to metal. I do not go that route . I tend to seal the daylights out of the sheet metal with epoxy and once it has set up I then apply the mud . The Allmetal is harder to shape , takes longer to shape , uses more paper and because of this is not used by many shops . I have never had a failure going this route . I have had top coats fail and by VERY carefull sanding I went removed the top coat to the epoxy seal coat , resealed the paint in epoxy and reapplied the top coat . This was a driveway paint job , the supplier covered the cost of the paint - 1800 bucks which would be around 3600 these days . The company had a ton of questions about my prep work but admitted that the product was at fault .. The prep was epoxy , Allmetal , and seal in epoxy . The company rep and I think it was a scientist or engineer told me that was the only way to go for a decent repair .
Allmetal is just one brand there are others and I have been pleased with them . Off the top of my head I do not know the brands name .
edit - only thing I see in my shop is USA - all-metal
I would paint the sheet metal first - then stick on the sound deadener , but that is just me , I tend to push the boundaries . My street rod has peel and stick roofing material as a sound barrier . I have glass and carpet underlay placed and sealed in plastic bags stuffed in areas on top of the peel and stick . Many factory vehicles have sound material stuffed in plastic bags .... seems to work fine and does not hold water .
Blast, then epoxy prime everything, unless your using body solder. I have used a small paint brush to get all of the seams. If you don't get the seams you will have a nice rust stain on your pretty paint. You will always need a small amount of filler, and then onto your top coats.
To bad your not closer I would trade you body work for axle work.
I looked for an image on the web - none found but there were quite a few questions from people asking what the bags were for . Found it in Corvettes , Dodge vans , Daytona and in the quarter panels on a Dodge pickup .
The material inside the bags looks like shredded up recycled fabric . Much the same as what is under the carpet on many new trucks . You know the stuff that sucks up and holds all the water ? Shredded stuff that is pressed together in a sort of loose mat . The bags are usually black or grey and sort of retangular shape with the ends sealed with what looks like a hot knife . The bags keep the moisture out . Even found the bags in a rocker panel on something I was dismantling .
Hope that helps
Bruce
How about an article on found tools ? Or garbage sale tools , or one off tools ? or home made tools ? Also shops and garages . The places that PWs go to get warmed up and cuddled ...
That would be great!
Power Wagon Advertiser monthly magazine, editor & publisher.
Why is it that the inside of old truck cabs smell so good?
Blast, then epoxy prime everything, unless your using body solder. I have used a small paint brush to get all of the seams. If you don't get the seams you will have a nice rust stain on your pretty paint. You will always need a small amount of filler, and then onto your top coats.
To bad your not closer I would trade you body work for axle work.
I would be all about that kind of trade for sure! I'd much prefer to do axle work and let someone with experience handle the body work portion of this.
So you are saying I can use the "all metal filler" over top of the epoxy primed areas? I'm starting to think more about making my inside tailgate skin actually be held on with a series of small button head or even possibly countersunk screws, if I dare safely source small enough hardware that I am comfortable using. This way I can have the inside and outside of the gate panels blasted and epoxy primed, then install my sound deadening over the epoxy primer, and then finish out the body work with the all metal filler? Does this sound right? Thanks for squaring me up guys. This is TOTALLY new territory for me.
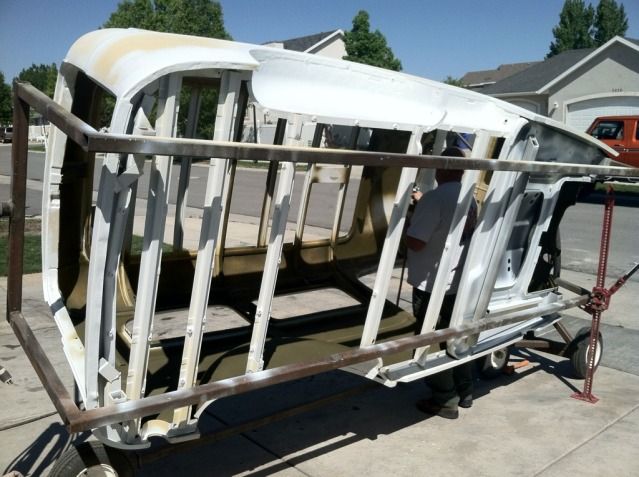
-Also, how much does the body weigh when its hanging on the rotisserie like that? Mine doesn't apear to need any kind of work under the floor or where its difficult to get to, but I will need to remove it from the frame when I go to box the frame and then send it for powder coat.
One more question... whats your opinion on Zinc Phosphate primer? I know that Zinc Chromate is for Aluminum, but I've got an old CJ-5 that had a Zinc Phosphate primer job done on the hood, and the paint is nearly long gone and that green zinc phosphate coating is holding strong. Plus, (this is probably dumb) but I think the parts on this truck that I am leaving primer, ie, inside of the tailgate, and a few nooks and crannys would be kinda trick looking if left with that aircraft zinc primer color look. Probably a dumb idea but just tossing it out there.
The Z-grip filler I got is designed for strait to metal, but it will work over Epoxy too which is how I applied it. Like everyone else I liked the idea of everything protected by the epoxy primer and the filler sandwiched between. My plan is to primer, do my filler work, then top coat with another layer of epoxy before going on to the primer-surfacer.
I know the P-sheet for the PPG Epoxy primer I put on my cab mentioned that a zinc pre-treatment or etching primer would improve adhesion and corrosion resistance. The cab of my PW was coated with Ospho (a zinc phosphate wash) at the stripping company, and I always like to clean my parts with Eastwoods "after blast" after prepping them, which leaves a zinc phosphate coating. It won't protect the metal in the weather for long, but it will prevent and remove any flash rust until the part is ready for paint if stored inside.
Most of the zinc phosphate coatings you apply though are fairly thin and weak, if you want hard core you can have it galvanized. A little tricky to paint over but you barely even need to. My neighbor had the frame of his project Land Rover done that way and it's been sitting outside for probably a year or more now with no rust anywhere. Not cheap and I think the only place around here that can do it is up near PA but even if you chip or scratch it the zinc will protect the metal.
My tailgate is far from done but the frame is constructed . I was contemplating using aluminum panels on the inside of the gate . I was hoping to hold the panels in place with oval head screws and be able to remove the panels for access and what not .
Got my power steering pump in pieces , Biggest issue is the can has no return line and I am under the impression that the return line should be low at their dump end . Reservoirs are generally mounted at the highest point , higher than the booster , which means a return line to the reservoir would be at a high point . I am confused and a tad frustrated . I want to toss on a part and walk away .
 Tweet
Tweet


Comment