Announcement

Collapse
No announcement yet.

The WC53 Carryall thread .

Collapse
X
 
  • Filter
  • Time
  • Show
Clear All
new posts

  • Door Skin

    Bruce, that looks great. For glassing, you could check out the process for boat building. In order to get a smooth surface, we used arborite or similar in the reverse plug and pulled pieces from that. Lots of one off boats are built up and then finished using auto body processes. Bi-axial cloth is stronger than mat but your framing looks strong anyway. Have fun!

    Jess
    Comment


    • Here is a sweet image

      How is the progress on this one coming along. The more I ride in the fully coil sprung Bronco the more I wish I had gone that route in the Carryall. The ride in the Bronco is worlds different than the ride in my leaf sprung trash truck.
      Attached Files

      Comment


      • Windshield post cover

        I made the cover from hardboard but when it was installed it stood out about a 1/4 inch along the front side. I taped it in place and left it over night and it fit better at the top and along the door but still was proud in the front. There are more little curves in there than anticipated. The solution was to dig up some old 1/16 aluminum that was anodized on one side. Once it was cut out I shaped it in place with a body hammer and rolled the front edge in the vice. The roll is not consistent. there is more of a roll in the centre than at the ends. Seems to fit ok. I will need to attach the leather and then see how the cover fits. I am going to use screws. I do not like the look, but of all the options for attachment the screws seem best.
        I made these while waiting for the mud to dry on the lower gate.
        Attached Files

        Comment


        • Fabricating Parts

          I had a tour of a major refit of a yacht in a local yard after I expressed interest in the materials they were using. What caught my attention was that all the new parts were made from a composite material in various shapes and flat sheet. The yard manager explained that they had a full visual scan of the yacht done, drawings produced of the modifications and additions. A specialty supplier in Vancouver B.C. cut all the multitude of structural framing and finishing parts which were shipped to the yard. At the yard, it was assembled on the existing hull with the parts glued together and then the typical filling and fairing done to yacht standards. I had never seen this done and can't help wondering if this material and process could be used to produce parts for our old vehicles. For one off type construction, the parts could be saw cut, assembled and finished just like metal without the issues of rust or concerns about wood and moisture.

          Comment


          • Something worked

            The window post covers got installed today. Took about an hour and a half to trim, glue and stretch the leather in place on each cover and additional time to drill the window post and install the #6 metal screws without breaking them off. I would turn in and back off and tighten some more and back off again, several of the holes took more than one screw. I would remove the old one if I thought the thread was starting to gaul. Zero breakage and the cover fits better than I thought it would. The leather is old and some has a used look. I do not like the screws and really do not like the shiny screw heads and washers. They will get a dab of either satin black or hunter green. I also made some wind lacing for the front doors.
            Hey Jess , thanks for the composite idea. The stuff works great in some applications. A interior kit for the carryall might be one application. Plastic floor boards that look like wood?
            Attached Files

            Comment


            • And some thing did not work.

              The sides and bottom of the rear gate fit fine. The top edge is not up to standard. The middle of the bulge or profile is 3/8 too low. The cure for this would have been to cast or fill the steel gate with foam. Then shaped it and test fit it AND then glassed the surface. I am not about to tear it out and change it, the goal is to get it licensed and a few test miles on it. PDQ. I need to paint it inside and out and come up with a latch assemble. Need some straps to support it too.
              Attached Files

              Comment


              • Wow Bruce! Evertything you are doing looks amazing! The gate is a great fit! Makes mine look like a joke! Yours has that nice pretty compound curve that I lacked the english wheel to do correctly. I think that once I get mine driving, and the other systems figured out I may go back and try my hand again at building a cleaner one that fits better and has the compound curve. I've learned a lot in the past few years since I have started this project.

                I dig the A-pillar cover plates! I want do so something like that for mine but sneak a louver or two into it for forcing some defrost /defog action onto the glass around the edges.

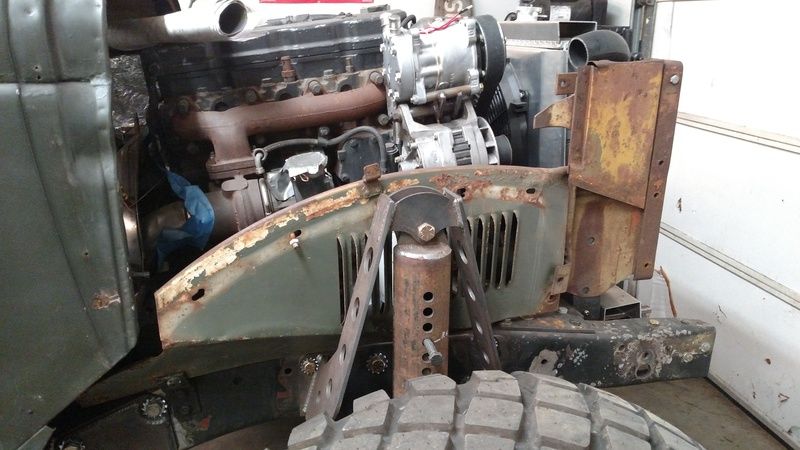
                I haven't touched my Carryall in about 3 months now. Been busy helping other folks out and been busy destroying my trail rig. I've been daydreaming about my Carryall a lot lately so I am hoping to work on it some this weekend. Back to fighting the fitment of the cooling system. It will all fit, now its just building a clean and serviceable mounting system that allows plenty of airflow and won't cause fatigue cracking of the cooler units.

                In regards to the 3D scanning feature, that stuff is pretty cool. I've had the chance to use it some with creating profiles on old Bridge Structures that need repairs. It will layout rivet dimensions, gusset sizes and even cross sections remaining of truss members that would take days of specialty access and hand measurements.

                Plastic floors in the Carryall... nah.. I can't wait to unveil my plans for my rear floors... The suspense is killing me but its also my motivation to hurry the heck up and work on this truck. Its going to be the icing on the cake for my build I think.
                1942 WC53 Carryall in progress.

                Comment


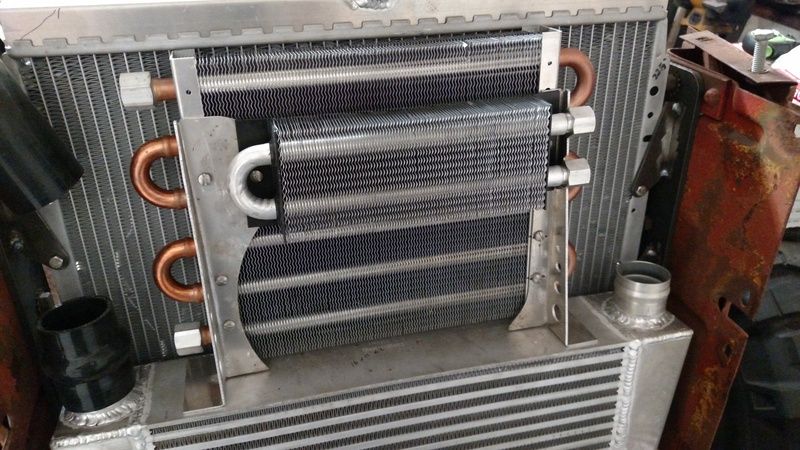
                • So worked in this thing yesterday. Packaging my coolers. Going to make the intercooler support my transmission cooler and power steering cooler.

                  Kinda like this. Might change the passenger side a little to allow more air through that panel for the oil cooler but you guys get the idea. Just using pinch nuts, Rivnuts, whatever you wanna call em for the attachments. Its going to be a little bit of extra load on the intercooler but its heavy with a 3/16" top plate and heavy duty as well. The AC condenser fits right in front of all of this mess.


                  The other thing I am trying to work out is the logistics on an air intake. I am thinking about building a square box type intake that seals up against the side of the passenger's side hood and uses the louvers in the hood panel as the air intake ports. My concern is that it is going to be enough surface area. I want the engine to get cool outside air and this also does two things... Its going keep road water that is getting splashed under the truck from getting into the intake (no risk of hydro-lock from hitting a deep puddle, and the other thing is kind of vain but the Turbo charger will be whistling its little heart out right through those side louvers so people next to me in traffic will seriously by like "What in the world???!!! Thats awesome!!!" I was thinking about pulling from the inner fender but fear dust and water spray from the tire... But I dunno, its a lot more louvers and surface area.

                  1942 WC53 Carryall in progress.

                  Comment


                  • how is this for an idea?

                    Build two boxes.
                    One box for the bottom louvers.
                    One box for the top louvers.
                    Run a pipe between the two and place a "fording valve" in that pipe. The only time you would use the valve would be when crossing a river.
                    The bottom box could be baffled and have a coarse pre filter.
                    The top box would have your normal filter.
                    How does that work for you?

                    I think your front cooling arrangement works fine. If you can get the air conditioning in there you are doing great. I am going to add the air conditioning at a later date. What source is your air conditioner rad?

                    trail rig - I sure wish I had one. After riding in the coil sprung Bronco I am sold on the coil spring and control arms over leaf springs.

                    Good to hear from you. I was concerned that you were too darn ill to do anything. You take care.
                    Bruce.

                    Comment


                    • Beautiful as always.

                      For the air intake I'd hold off just yet. You have a bunch of plumbing to run down that side with the intercooler tubes, AC lines, etc. and most of them kind of have to go where they have to go. It will drive some of where your air cleaner/box assembly will have to go. I ended up having much less useable room over there than I though I would since like you I wanted to keep it high. I'm OK with what I have other than I need to build a heat shield around the back side of the filter facing the exhaust, but the whole thing is very tight.

                      The other lesson learned from my weekend fighting with hood fitment is to play with it now. I ended up having to loosen all the cab bolts and slide it forward, which caused my steering and throttle linkages to be too long and need modified slightly, in order to get anywhere close to the right gap, and even at that it was uneven. That turned out to be a factor of how I tightened down the radiator cowl bolts. It also revealed some fitment issues with the hood parts.

                      Long story short, I should have played with fitting the hood at your stage, if for no other reason then to ensure I was mocking everything up in the right location, since ultimately will determine how close the cab and radiator are to each other and everything else under the hood. It also might reveal some body work that needs to be done to the hood, as the lower half of one side has a slight bend on mine that is causing issues, and trying to tweak it with finished paint is very delicate work.

                      Comment


                      • The AC unit is a "Super condensor" from Vintage air, and I ordered it through Scummit-racing. It was around $110 I think. Its not the biggest one I was hoping to stack in there but in this instance it allows the IC to get full surface area of clean cool air, which means a more efficient engine, which means less heat generated and hopefully overall less cooling load required by the Radiator.

                        Damien, I am planning on pretty much getting this thing driveable and shaking it down before any real paint goes on it and then blowing it all back apart for the finishing work, this way any trimming, modification, etc can be done without having to mess with the paint. Mine won't be nearly as glossy as yours either and the body work isn't going to be super pristine either since thats not really the overall concern or theme for the truck. I fear shiney paint would create one more reason for this thing to be only a show queen and not a daily enjoyer. And you are certainly right on cramming more lines, hoses, etc in there. I am just thinking outloud. Its looking like a straight vertical updraft tube from under the truck may be my only option. I am actually thinking about using the lower front cross member as my draft box and then using aircraft ducting to a filter box that is part of the turbocharger neck on the side of the engine. But as you said, gotta get the lines and stuff back to the firewall.. Thats also my other hold up on building my firewall. I want to get my AC lines run back to the firewall so that I can optimize my inlet locations and layout where my Master cylinder and brake pedal mount will be. Benefit of fly-by-wire throttle is that it can go anywhere I want and not have to mess with that kind of linkage. Once this front cooler stuff is mounted I am going to spin the truck around and try and get my fuel tank mounted because I am tired of tripping over it on the shop floor and that will get me one step closer to getting this motor fired up!
                        1942 WC53 Carryall in progress.

                        Comment


                        • Sometimes progress doesn't look like progress...

                          Finally got my body pulled off to work on completing all the mounts and hangers on the frame. Haven't had much time to work on it, but continuing to do what I can when I can. Hope everyone else is plugging away too.
                          Attached Files

                          Comment


                          • Looks like a good start to moi

                            What axle are you running? I can not see the hubs and the pumpkin looks to be on the drivers side. Also did you pull the original front cross member? I see a lot of builds that have lost the member because it is in the way of too many other critical parts.

                            Comment


                            • Thanks

                              I'm using 2003 Ford SuperDuty axles. And yes I pulled the front crossmember, it was conflicting with my steering setup. I'm still working on building a replacement to mount the radiator. I wanted to finish repairing and modifying my fender and body mounts then put the body back on before finalizing the radiator mount to make sure everything matched up correctly.

                              Comment


                              • Doors, dings, darn and DUH

                                IMG_1338.JPG
                                Not sure if I covered this in an earlier post or not. I had issues with the door contacting the heads of the standard screws. the solution was simple, except I had to order a whole box of screws to get sixteen fine threads that I needed.
                                Button heads are a bit lower profile than the hex heads, plus I like the look.
                                The rest of the screws in the box will find places on the Carryall at some point.
                                If there is room for star washers under the head I will use them. Otherwise it is a dab of locktite.

                                Comment

                                Working...
                                X