 Tweet
Tweet
The wing window for one!
-
Greg Coffin
Unrepentant Dodge Enthusiast
1951 Dodge M37 - Bone Stock
1958 Dodge M37 - Ex-Forest Service Brush Truck
1962 M37-B1 - Work in Progress
1962 Dodge WM300 Power Wagon - Factory 251, 4.89s
1944/1957 Dodge WM500T 6x6 Power Wagon - LA318-3, NP435, 5.83s, Power Steering, Undercab Power Brakes
1974 Dodge W200 - 360/727, Factory Sno-Fighter Package -
Nice day for a drive. High's in the mid forties, sunny, and the mountains were out in all their glory. About 11 hours total drive time.
Tow rig is my 1999 F250. 7.3 diesel, 6-speed manual. This is the third old Dodge I've hauled home with a Ford, and I have not yet experienced any spontaneous combustion. I wouldn't try it with a GM, though.

Comment
-
Beautiful picture, and nice to see the Carryall on it's way to a good home. Keep us informed on your progress. You got a nice one there!Greg Coffin
Unrepentant Dodge Enthusiast
1951 Dodge M37 - Bone Stock
1958 Dodge M37 - Ex-Forest Service Brush Truck
1962 M37-B1 - Work in Progress
1962 Dodge WM300 Power Wagon - Factory 251, 4.89s
1944/1957 Dodge WM500T 6x6 Power Wagon - LA318-3, NP435, 5.83s, Power Steering, Undercab Power Brakes
1974 Dodge W200 - 360/727, Factory Sno-Fighter PackageComment
-
Speaking of Alaska and Carryalls
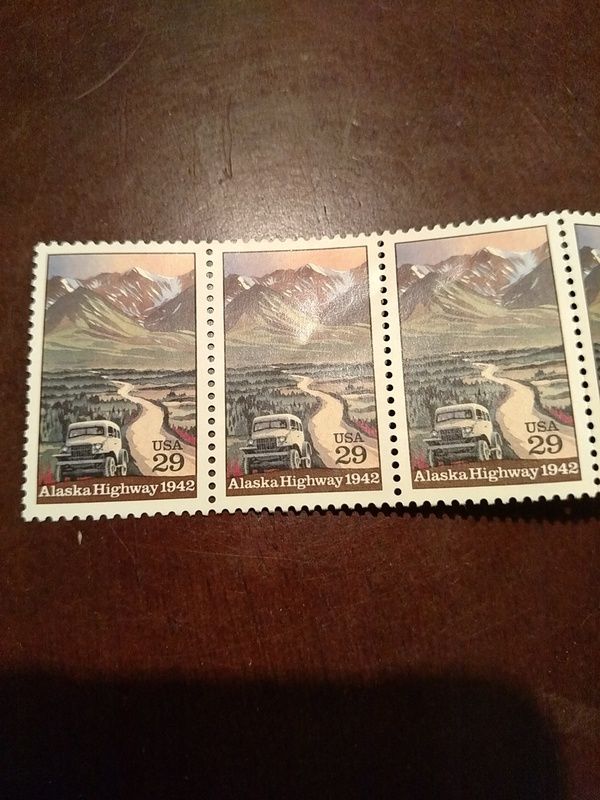
i really like this stamp. it would be fun to find the location that the original painting depicts and park a Carryall in the same spot. But does the location really exist or is it from the artists imagination? This stamp was printed in 1992 for the 50th anniversary of the Alcan or Alaska highway. The stamp is supposed to depict the Alcan highway in 1942, which might explain the lack of pot holes..... the highway is just a few days old. Found a picture from when the highway was completed and low and behold we have a Carryall. that is quite the hill.
edit: working on the Carryall heater system, I spent the last month prepping for a SAR rope test and did little on the Carryall. Also got some military interior lights that I want to install in the Carryall.Comment
-
and we have the original photo
So the spot does exist. Now who will be first to get their Carryall there? 75th anniversary is coming soon.Comment
-
Bruce! That is SUPER COOL! I'm geeking out big time! How large and quality of an image are those original photos? Could you send me what you have to my blackwaterfabrication@gmail.com email? I would have this framed and hung in my garage for sure! So very cool! Many thanks for sharing! I spent 90% of my day working on my Carryall. Chasing down fittings and routing plumbing stuff for AC, Intercooler, etc. Too many systems, not enough space.1942 WC53 Carryall in progress.Comment
-
Geeking out big time.
Yep, I am with you there. The stamp image I got from some link I tripped over that lead me to ebay. The other two images I grabbed from the internet, so I doubt the resolution is very high. If you do a search on "Alcan highway" the images will show up. I have a video tape somewhere in the house that shows films of the highway being built and traveled on. There is a WC53 in one of the clips. Not sure where the video has gotten to - a DVD would be nice.
A sheet of those stamps might make for a bit of wall art. **** your wife could paint a copy.........
Oh no it gets worse. Take a look at the 9.30 minute mark on this old film... what is that, a Carryall? https://www.youtube.com/watch?v=CaSlVOZ9Dpg
and worser still, check out 7.02 in this video, is that cool or what? https://www.youtube.com/watch?v=1ThlIabKgnM
and here is one stuck in the mud- around 1.25 minutes in, or maybe it is not stuck but waiting to take a run. https://www.youtube.com/watch?v=BkQKQN26JMIComment
-
Bruce, many thanks for that! I greatly enjoyed looking through those videos, especially at the Carryalls in them. Thumbs up for sure!Originally posted by Bruce in BC View Post
Stuff like this certainly keeps me motivated. Over the weekend I finished up chasing and welding a few pinhole leaks in my radiator when I pressure tested it, had to move my AC condensor out of center by 1/2" to get a hose fitting to fit due to everything being such a snug fit, ordered a bajillion fittings and adapters to get my Transmission cooling lines and PS cooling lines sorted out and routed cleanly. -08 hose is spensive.
I'm spending a little bit of extra money at this phase and making as many of my fluid connections "field serviceable". I could just have hoses made for the correct length and location, but I feel that the ability to make a repair, on the side of the road, on a Sunday afternoon, miles from home, with no repair shops open, with a simple set of wrenches and a pocket knife, is worth my efforts. I'm going with socketless hose for the locations of lower pressure and then anything high pressure is getting braided hose with AN fittings. I'm also going purely with Aeroquip stuff that way I know its the higher end stuff. Russels seems to be okay but I am avoiding the Summit and Speedway off brand chineese stuff.
Waiting on some wiring connectors, an intake horn for the Cummins, a v-band clamp, and misc intercooler tubing and connectors and I'll be able to finish routing all that mess and hopefully get that much closer to starting this beast.
I have determined that I am not going to use hood support rods. I, for one, can't afford the room, and secondly, the way I have my front core mounted, they aren't really needed. I picked up the truck in the center and let the front of the frame hang as though the truck had just basically "jumped" as it teetered on the jacks. The distance between the firewall and the cowl increased by 3/32". I figure mulitply that by 4 in the worst case scenario, so 3/8" total hood movement from full jump to hard landing, not including inertia gained... I'm okay without the hood rods in my setup.1942 WC53 Carryall in progress.Comment
-
Old Carryall photo update
There are a whole series of post cards or promotional cards of the Alcan/Alaska Highway. These were released by the American Army in 1942. I am uncertain how many cards are in the series but I ran across one #18 and there could be more. In several of these photos, quite a few, there is a Carryall in the photo.
My best guess is a Army photographer was sent out in a Carryall to take pictures.
I have quietly purchased three of these photos. The price can range a lot so triple check the postage when buying one. $2.00 postage from one seller, $36.50 from another. I went with the $2.00 postage.
s-l1600.jpg
This photo is pretty sweet, I have the same one, in the mail system as I type.
Alex, you are doing great, I wonder if the fenders and splash aprons will stiffen up the front a tad. And how many jumps do you plan?
2016, Might be the date for cruising the Alaska highway.Comment
-
Another one comes up for sale
Craigslist $19000 and change for a runner with character.
https://modesto.craigslist.org/cto/5280814594.html
Check out the size of the steering wheel and the other little details. There is enough there to put a grin on your face.Comment
-
Alcan scene
Bruce, I've driven the Alcan a couple of times, and while I don't remeber that spot specifically, I know there are few spots along the highway where the mountains look similar. I think it would just be a matter of driving it again with a copy of the photo taped to your dash...
I plan to drive mine the whole length of the Alcan someday, from Dawson Creek to Fairbanks. It would be a long, enjoyable drive at the speeds of a stock Carryall. Plenty of time to take in the scenery.
I have a house to build before I can spend much time on my carryall, though, so I doubt I'll make the 75th anniversary deadline.Comment
-
So I was telling my wife about the stamps the night that you posted the original message and she thought that was really cool... So behold what showed up in a little envelope in the mail since my wife is so cool and resourceful!
In the meantime I managed to get another portion of the firewall planned out and somewhat fitted. I have the brake hydroboost and master cylinder hung. Its a 1-5/16" bore, so its a big bertha. I've got a spreadsheet setup that I can enter various caliper bores into and then compare that to the stock setup in my hydroboosted Dodge Mega Cab. I even have the pedal ratio in the calculation so that if there is an odd variance in the fluid ratios, I can adjust my pedal ratio to still achieve a similar foot pressure, but compensating for the fact I expect the Carryall to be around or just under 6k lbs and my truck is around 8200 empty.
I am planning on a brace that goes from the bottom of the firewall up to the master cylinder to booster connection point. Attach it with a double nut and saddles so that I don't have to split the pair up to install or remove. That brace can also be a decent support for my PS reservoir which is on the way. I am trying to decide if I want the wiring harness connector to bulkhead to the firewall near the side of the cowl outside of the brake booster or to the inside between the engine and the booster. I am going to build my relay center halfway up the driver's side frame rail where the underhood battery was originally but am just going to have my main pair of batteries in the radio batt. box. I'm not running any heavy amperage through my firewall bulkhead and am running relays and such under the hood, just to keep things minimal under the dash, which is going to be a clutter of wire with the gauges, AC, and switches anyways.
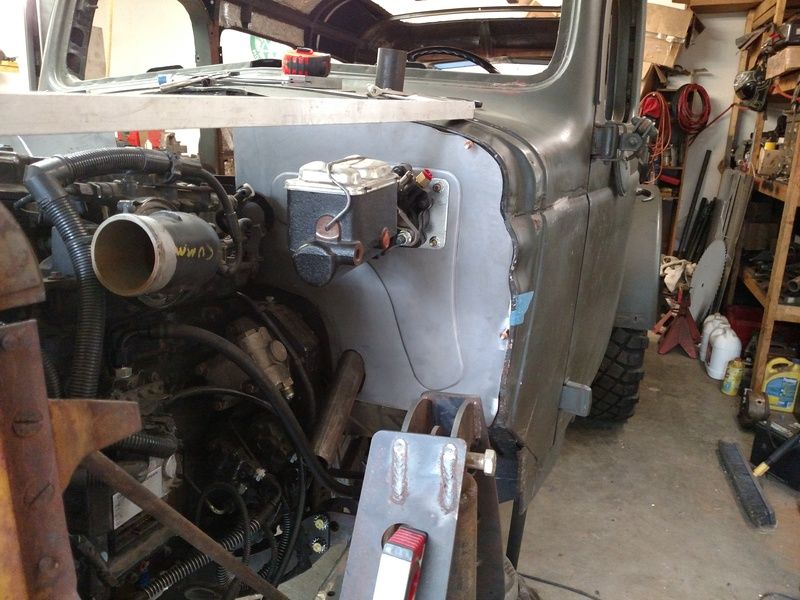
Something I think I have talked myself into but don't want to do, but feel may be necessary... I think I need to cut the dash and move the steering wheel to center under the gauges. And the primary reason is for foot room. That rear gear-train on this ISB170 is massive and I have no right foot room on the drivers floor due to the column being so close to the transmission cover even though I built it all as tight as possible AND the engine isn't even centered in the truck, its pushed as far against the passenger's frame rail as possible; this motor aint your grand-daddy's 4bt. The Allison is also huge, and there is a speed sensor right in the way preventing me from getting too snug to the bell right there also. If I cut the bottom of the dash and move the column support about 2" towards the door, I think I will have enough comfortable room for the throttle pedal and then I can build the brake pedal shank to fit around the bottom of the column if need be. The pedal is a "fly-by-wire" unit so mounting it is not a huge deal and I can bend up a new shaped rod to get it where I want it. Extending it some will be nice anyways as I have a buddy that drives a truck that my engine/trans combo came out of and he said the short throw on the pedal is annoying on a bumpy road. Ergonomics are such a pain, but its something that is so very important. I think the 2" lateral move will still afford me room for the steering wheel. When I skin the doors back I am going to have a small armrest built/blended in to help with driver's comfort. The wheel is a 16" diameter I believe. It may feel a little funny with power steering being that large of a wheel, but with the 38"s and no hydro-ram it may be a little bit necessary. All of my steering hoses are -6, which for some reason feels small to me.
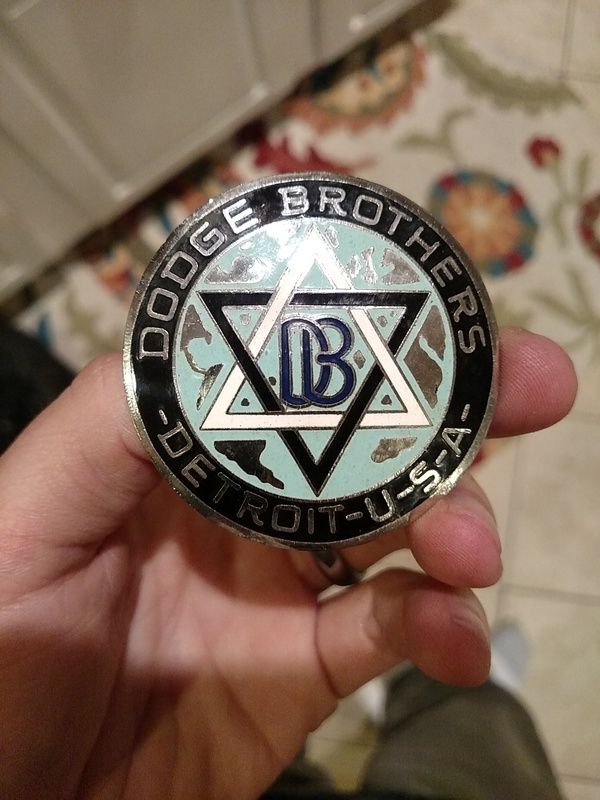
Lastly, I have been looking at all of the aftermarket steering columns and I hate them all. None of them look of the proper nostalgia and I can live without self defeating turn signals even though I have some ideas to help with that. I am just going to build my own 2" dia straight column. A piece of 3/4" splined shaft, some bearings and bushings and a little machine work. This also allows me to install my own center cap. Yes, I know its not original and my appear a touch off from my military theme, but... I can't help myself on this one. Its such a nice condition emblem that it HAS to get used as my horn button / wheel center cap.
 1942 WC53 Carryall in progress.
Comment
-
Regarding the steering wheel relocation, what if you left the wheel in the original position, and ran 2 universal joints in cab so you could jog the steering shaft over 2" at the firewall to give you more foot clearance. I'm not a big guy, but I feel that the driver's door is pretty close, and 2" might make the door feel too close.
Thanks for all the great updates on your project.Greg Coffin
Unrepentant Dodge Enthusiast
1951 Dodge M37 - Bone Stock
1958 Dodge M37 - Ex-Forest Service Brush Truck
1962 M37-B1 - Work in Progress
1962 Dodge WM300 Power Wagon - Factory 251, 4.89s
1944/1957 Dodge WM500T 6x6 Power Wagon - LA318-3, NP435, 5.83s, Power Steering, Undercab Power Brakes
1974 Dodge W200 - 360/727, Factory Sno-Fighter PackageComment
-
Oh Greg that is too smart
I moved my column over towards the door, I am not sure how much but I will measure it today and find out. I have an after market column and it looks fine to me and I will take some photos of it today. Take a look at Lime Works columns. You can get one that does not have the turn signals in place and add the signal stat model to the column if so desired. I have one of those units if you are going that route. If you can, sit in the seat before welding that column in place, two inches might put the steering wheel too close to the door.
Found a short in my interior wiring. Of course it was in a spot that meant I had to remove a bunch of stuff. That is what happens when you add something extra to the dash, in this case a light in the glove box. Had to dismantle the whole box to get at the switch. Found this at 10:00 last night. Now I need to put it together.Comment
-
Awesome updates! Wish I had had the room for my hydroboost, was a real bear getting it to fit next to the engine and under the hood.Lastly, I have been looking at all of the aftermarket steering columns and I hate them all. None of them look of the proper nostalgia and I can live without self defeating turn signals even though I have some ideas to help with that. I am just going to build my own 2" dia straight column. A piece of 3/4" splined shaft, some bearings and bushings and a little machine work. This also allows me to install my own center cap. Yes, I know its not original and my appear a touch off from my military theme, but... I can't help myself on this one. Its such a nice condition emblem that it HAS to get used as my horn button / wheel center cap.
What about modifying the stock steering column to fit your needs. If you're cutting and modifying anyway just use the housing and modify the guts to fit your wheel.Comment
Comment